Plugin use cases
Here are a few reference guides on common use cases for creating custom plugins in Portal.- Add a custom scaffolder action to software templates
- Connect & sync software catalog to an external source
- Add a custom widget to the homepage
- [External] Connect & sync Soundcheck to an external source
- [External] Connect & sync search to an external source (Confluence)
Add a custom scaffolder action to software templates
Software templates allow your developers to start from square two when building a new application. Software templates have a series of actions – steps that run when using a template. For example, publishing to source control, deleting or renaming files, and registering software in the catalog. Portal has many built-in actions, but as you explore software templates you may find that you need a custom action to perform a step that may be unique to your company. For example, at Spotify we have custom actions to migrate files from one format to another, or to link Google Cloud projects to a software component. As an example, we’ll create a scaffolder module to add a custom action that pings an internal system with the ID of a new component. This might be used to kick off a security review, for instance.Before you begin
Verify you’ve set up a Backstage application locally. See the getting started section for more information.1. Create your plugin
Run thenew command from the root of your Backstage application. For the first prompt after selecting the scaffolder-module type.
plugins/scaffolder-backend-module-pinger folder with the structure of a backend module.
2. Modify the example action
Thescaffolder-module plugin that was created comes with an example custom action. Let’s modify this example slightly to ping an external service with the entity reference that was created by a template that includes this action:
plugins/scaffolder-backend-module-pinger/src/actions/example.ts
3. Update the backend module
The backend module needs a small update, since we changed the name of the example action:plugins/scaffolder-backend-module-pinger/src/module.ts
4. Install in your Backstage application
Now we can add the plugin to the Backstage application. First, we need to add the dependency to thebackend package.
Note: The backstage-cli new command may have already added the plugin as a dependency, so only add this line if needed.
packages/backend/package.json
packages/backend/src/index.ts
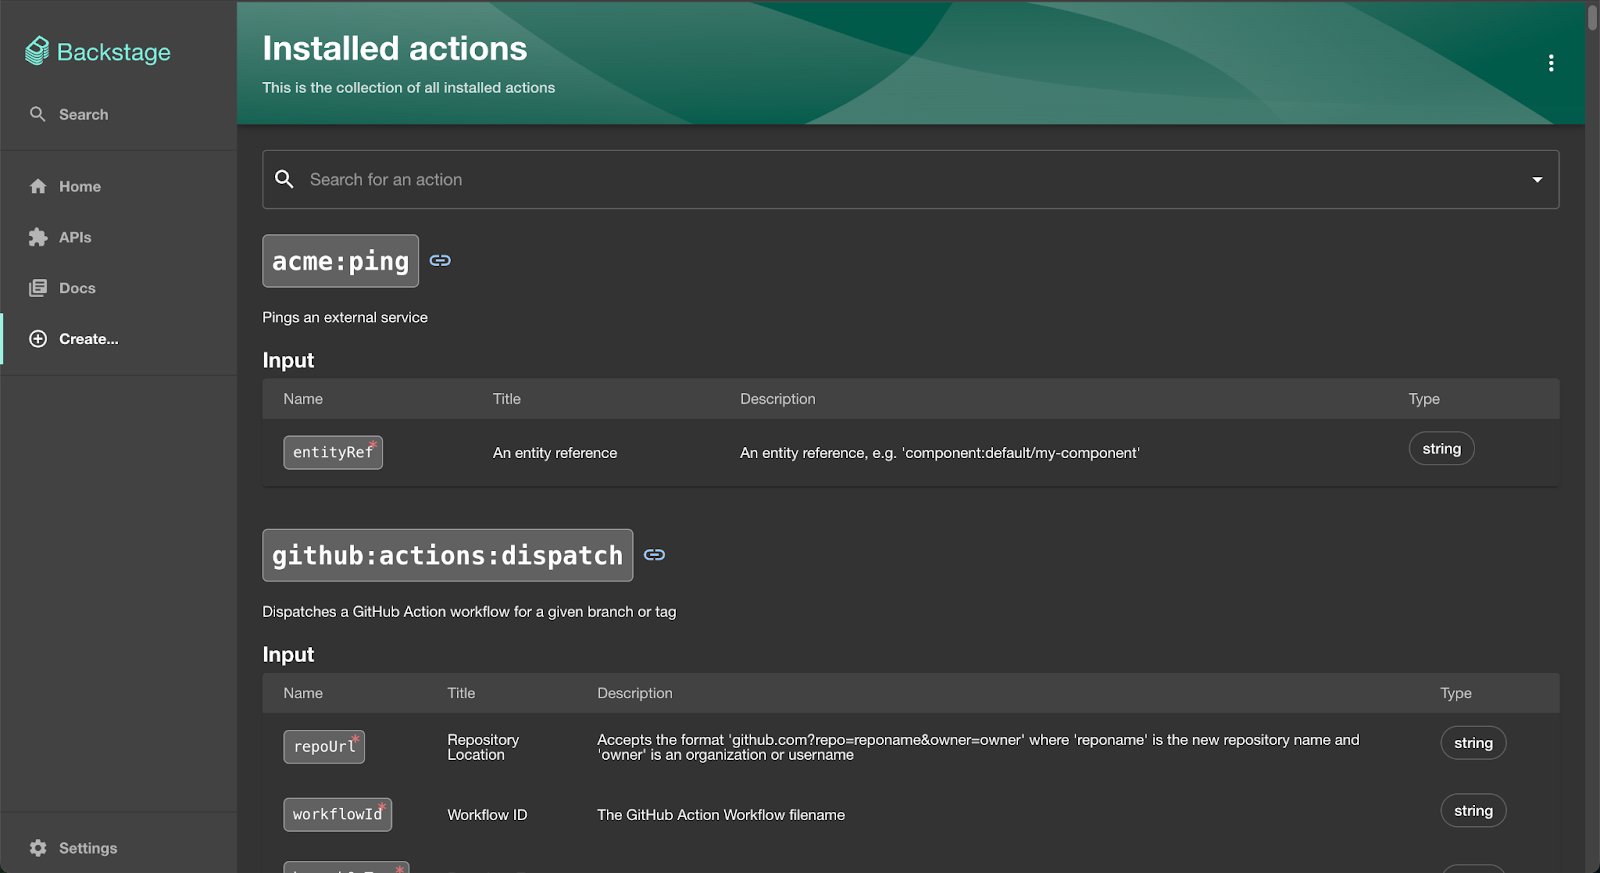
yarn dev to start up the application. Visit the scaffolder action list to verify that the new acme:ping action is listed.
5. Use the custom action in a software template
To put this action to use, we can modify the example template that comes with a Backstage application to use the new action. Let’s add theacme:ping action after the register step, since we want to use the entityRef that the register step outputs:
examples/templates/template.yaml
publish:github action, you’ll also need to set up the GitHub integration to see the template work successfully. Follow the instructions to set up your app-config.yaml with a valid GitHub token.
Restart the application with yarn dev to ensure the template change is picked up. Go to Create in the navigation and select the example template. Fill out the form fields, click Review and then Create at the end.
The template will execute, showing the new acme:ping action as the last step in the template:

Connect & sync software catalog to an external source
The software catalog is at the heart of Portal and Backstage. The software catalog is often populated with software components that have metadata descriptor files in source control, but it’s not unusual to pull in data from another source — such as an API gateway or another third-party service that tracks software at your company. As an example, we’ll create a catalog module that loads API components from Apigee, an API gateway offered by Google Cloud.Before you begin
Verify you’ve set up a Backstage application locally. See the getting started section for more information.1. Create your plugin
Run thenew command from the root of your Backstage application. For the first prompt after selecting the backend-module type, enter catalog for the plugin — this module will extend the catalog (which is itself a plugin!) to pull in data from an external source.
plugins/catalog-backend-module-apigee folder with the structure of a backend module.
2. Create a proxy endpoint
To call a third-party service, it’s common to create an endpoint in the Backstage proxy that your plugin can call; this way, authentication is handled in configuration.app-config.yaml
3. Create an entity provider
The catalog plugin supports adding entity providers, which can populate the software catalog outside of the normal method of a metadata file in source control. Create a new source file for the entity provider calledApigeeEntityProvider.ts:
plugins/catalog-backend-module-apigee/src/ApigeeEntityProvider.ts
definition field, which this particular Apigee API doesn’t provide, so this is an exercise for later.
4. Register the entity provider in your plugin
Now that the entity provider is created, you can register it in the plugin module using thecatalogProcessingExtensionPoint:
plugins/catalog-backend-module-apigee/src/module.ts
5. Install in your Backstage application
Now we have a backend module that registers an entity provider – the last step is to add the plugin to the Backstage application. First, we need to add the dependency to thebackend package.
Note: The backstage-cli new command may have already added the plugin as a dependency, so only add this line if needed.
packages/backend/package.json
packages/backend/src/index.ts
yarn dev to start up the application and verify that the API entities from Apigee appear in the catalog. The software catalog view defaults to Components, so make sure to switch to the API kind to see the new entities.
Add a custom widget to the homepage
The Portal homepage is built from widgets — self-contained cards that surface information on the dashboard. Plugins can contribute their own widgets using theHomePageWidgetBlueprint from @backstage/plugin-home-react/alpha. Custom widgets appear alongside the built-in ones and can be managed by Portal admins through the Manage Homepage menu.
The blueprint uses an absolute attachment point, so widgets from any plugin automatically attach to the homepage. You do not need to create a module specifically for the home plugin — widgets are simply included as extensions in your own plugin.
As an example, we’ll create a frontend plugin that contributes a “Team Announcements” widget to the homepage.
Before you begin
Verify you’ve set up a Backstage application locally. See the getting started section for more information.1. Create your plugin
Run thenew command from the root of your Backstage application and select the plugin type:
plugins/team-announcements folder with the structure of a frontend plugin.
2. Define the widget
Use theHomePageWidgetBlueprint to create a widget extension. The blueprint requires a components callback that returns at least a Content component.
plugins/team-announcements/src/plugin.ts
3. Implement the Content component
TheContent component is a regular React component. It can use Backstage APIs via useApi and any other React patterns.
plugins/team-announcements/src/components/AnnouncementsContent.tsx
4. Install and test
Add the plugin dependency to your workspace (if thenew command did not do it already):
packages/app/package.json
This step of manually adding the dependency is only needed in a local
Backstage application. Portal detects added plugins and wires them up
automatically.
Using a ContextProvider
If your widget needs shared state — for example, a data-fetching context that avoids redundant requests — return aContextProvider alongside Content:
ContextProvider wraps the Content component, so any React context values it provides are available inside Content.
Layout properties
Thelayout parameter controls how the widget is sized in the homepage grid. The grid has 3 columns.
Admins can override the default size through the drag-and-drop layout editor. The
min and max constraints prevent the widget from being resized beyond its supported range.