

Static credentials
- In your AWS account, create an IAM User with the permissions required by the Portal plugins you are using.
- Generate a new access key for the IAM User.
- In Portal, navigate to Settings → Integrations → AWS.
- Add a new item under Account overrides.
- Enter your AWS Account ID and select Custom.
- Enter the IAM User’s Access Key ID and Secret Access Key.
- Click Save.
Workload Identity Federation
Portal’s GCP service account mints an OIDC token and AWS’sAssumeRoleWithWebIdentity exchanges it for temporary credentials. The token refreshes every 45 minutes.
AWS-side setup
Portal includes a built-in scaffolder template that can generate the IAM role in your preferred IAC format. This is the recommended approach as it resolves your Portal instance’s GCP service account automatically.Using the scaffolder template (recommended)
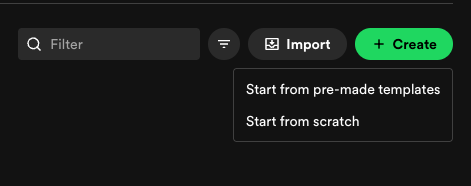
- In Portal, navigate to Create and click the Create button. From the dropdown list select Start from pre-made templates.
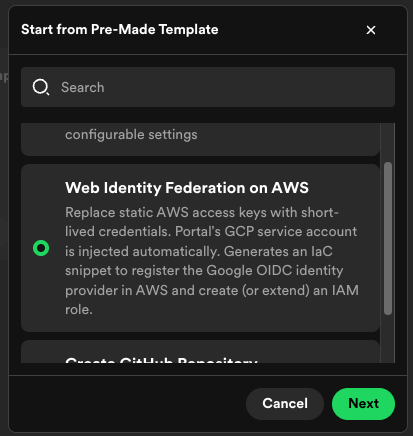
- In the dialog select Web Identity Federation on AWS and hit Publish to accept all defaults
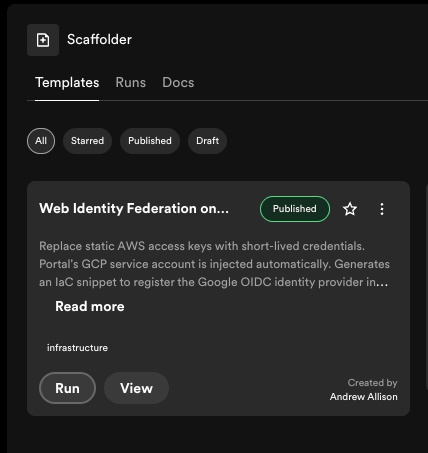
- Once the template has been published, click Run for the template
- Choose your IaC format: CloudFormation, Terraform, or CDK.
- Choose whether to create a new IAM role or attach permissions to an existing one.
- Select the AWS permissions your Portal plugins need (S3, Redshift, AWS Config).
- The template outputs an IaC snippet with your instance’s GCP service account ID pre-filled. Deploy it in your AWS account.
Manual setup
If you prefer to create the IAM role manually:1
Create an IAM role with a Web Identity trust policy
In your AWS account, create a new IAM role and attach a trust policy that allows Google’s built-in OIDC provider to assume the role. You do not need to create a custom OIDC provider because
accounts.google.com is built in to AWS.Use the following trust policy template, replacing <PORTAL_GCP_SA_NUMERIC_ID> with the numeric ID provided by your Portal instance:2
Attach permissions policies
Attach the permissions your plugins need. For example:
- S3 —
s3:GetObject,s3:ListBucket(TechDocs, URL reader) - Redshift —
redshift:GetClusterCredentials,redshift:DescribeClusters,redshift-data:*(Data Experience) - AWS Config —
config:SelectResourceConfig,config:SelectAggregateResourceConfig(Catalog ingestion)
Portal-side setup
1
Navigate to AWS settings
Go to Settings → Integrations → AWS.
2
Set the role name
Under Account defaults, enter the Role name of the IAM role you
created. This must match the role name in AWS exactly.
3
Add your AWS account IDs
Under Account overrides, add your AWS account IDs. Leave the credentials
as default; do not enter static access keys.
Supported plugins
The following plugins support Workload Identity Federation:Troubleshooting
- Trust policy
subdoesn’t match: Theaccounts.google.com:subvalue in your trust policy must match the Portal instance’s GCP service account numeric ID exactly. Contact support if you are unsure of this value. - Role name mismatch: The role name in Portal must match the IAM role name in AWS exactly (case-sensitive).
- Insufficient permissions: The IAM role must have the policies required by the plugins you are using. Check CloudTrail for
AccessDeniedevents to identify missing permissions. - Static credentials configured: If static credentials are set for the same account, they take priority over WIF. Remove the access key and secret key from the account override to use WIF instead.