> ## Documentation Index
> Fetch the complete documentation index at: https://backstage.spotify.com/docs/llms.txt
> Use this file to discover all available pages before exploring further.
# Publish and install custom plugins
> Publish and install plugins from your own Backstage workspace in Spotify Portal.
Custom plugins are Backstage plugins and modules that your organization develops, modifies, or maintains. You build and publish a workspace release directly to your Portal instance with the Portal CLI.
Custom plugin publishing is being rolled out gradually. If **Admin → Plugin
Settings** includes a **Custom Plugins** tab, use the workflow on this page.
If the tab is not present, follow the [previous publishing
instructions](#using-the-previous-publishing-method). See [Switching to
pre-built plugins](/docs/portal/managing-plugins/migration) for rollout details and
help moving existing plugins.
## How custom plugin publishing works
A **publishing source** is a long-lived release channel between one Backstage workspace and one Portal instance. Each publication bundles the compatible frontend and backend features selected from the workspace into a single, coherent source version.
Create one publishing source for each repository or workspace, not one for each plugin. A workspace often contains several related plugin frontends, backends, modules, and shared packages. Publishing them together makes the active source version represent code that was developed and tested together.
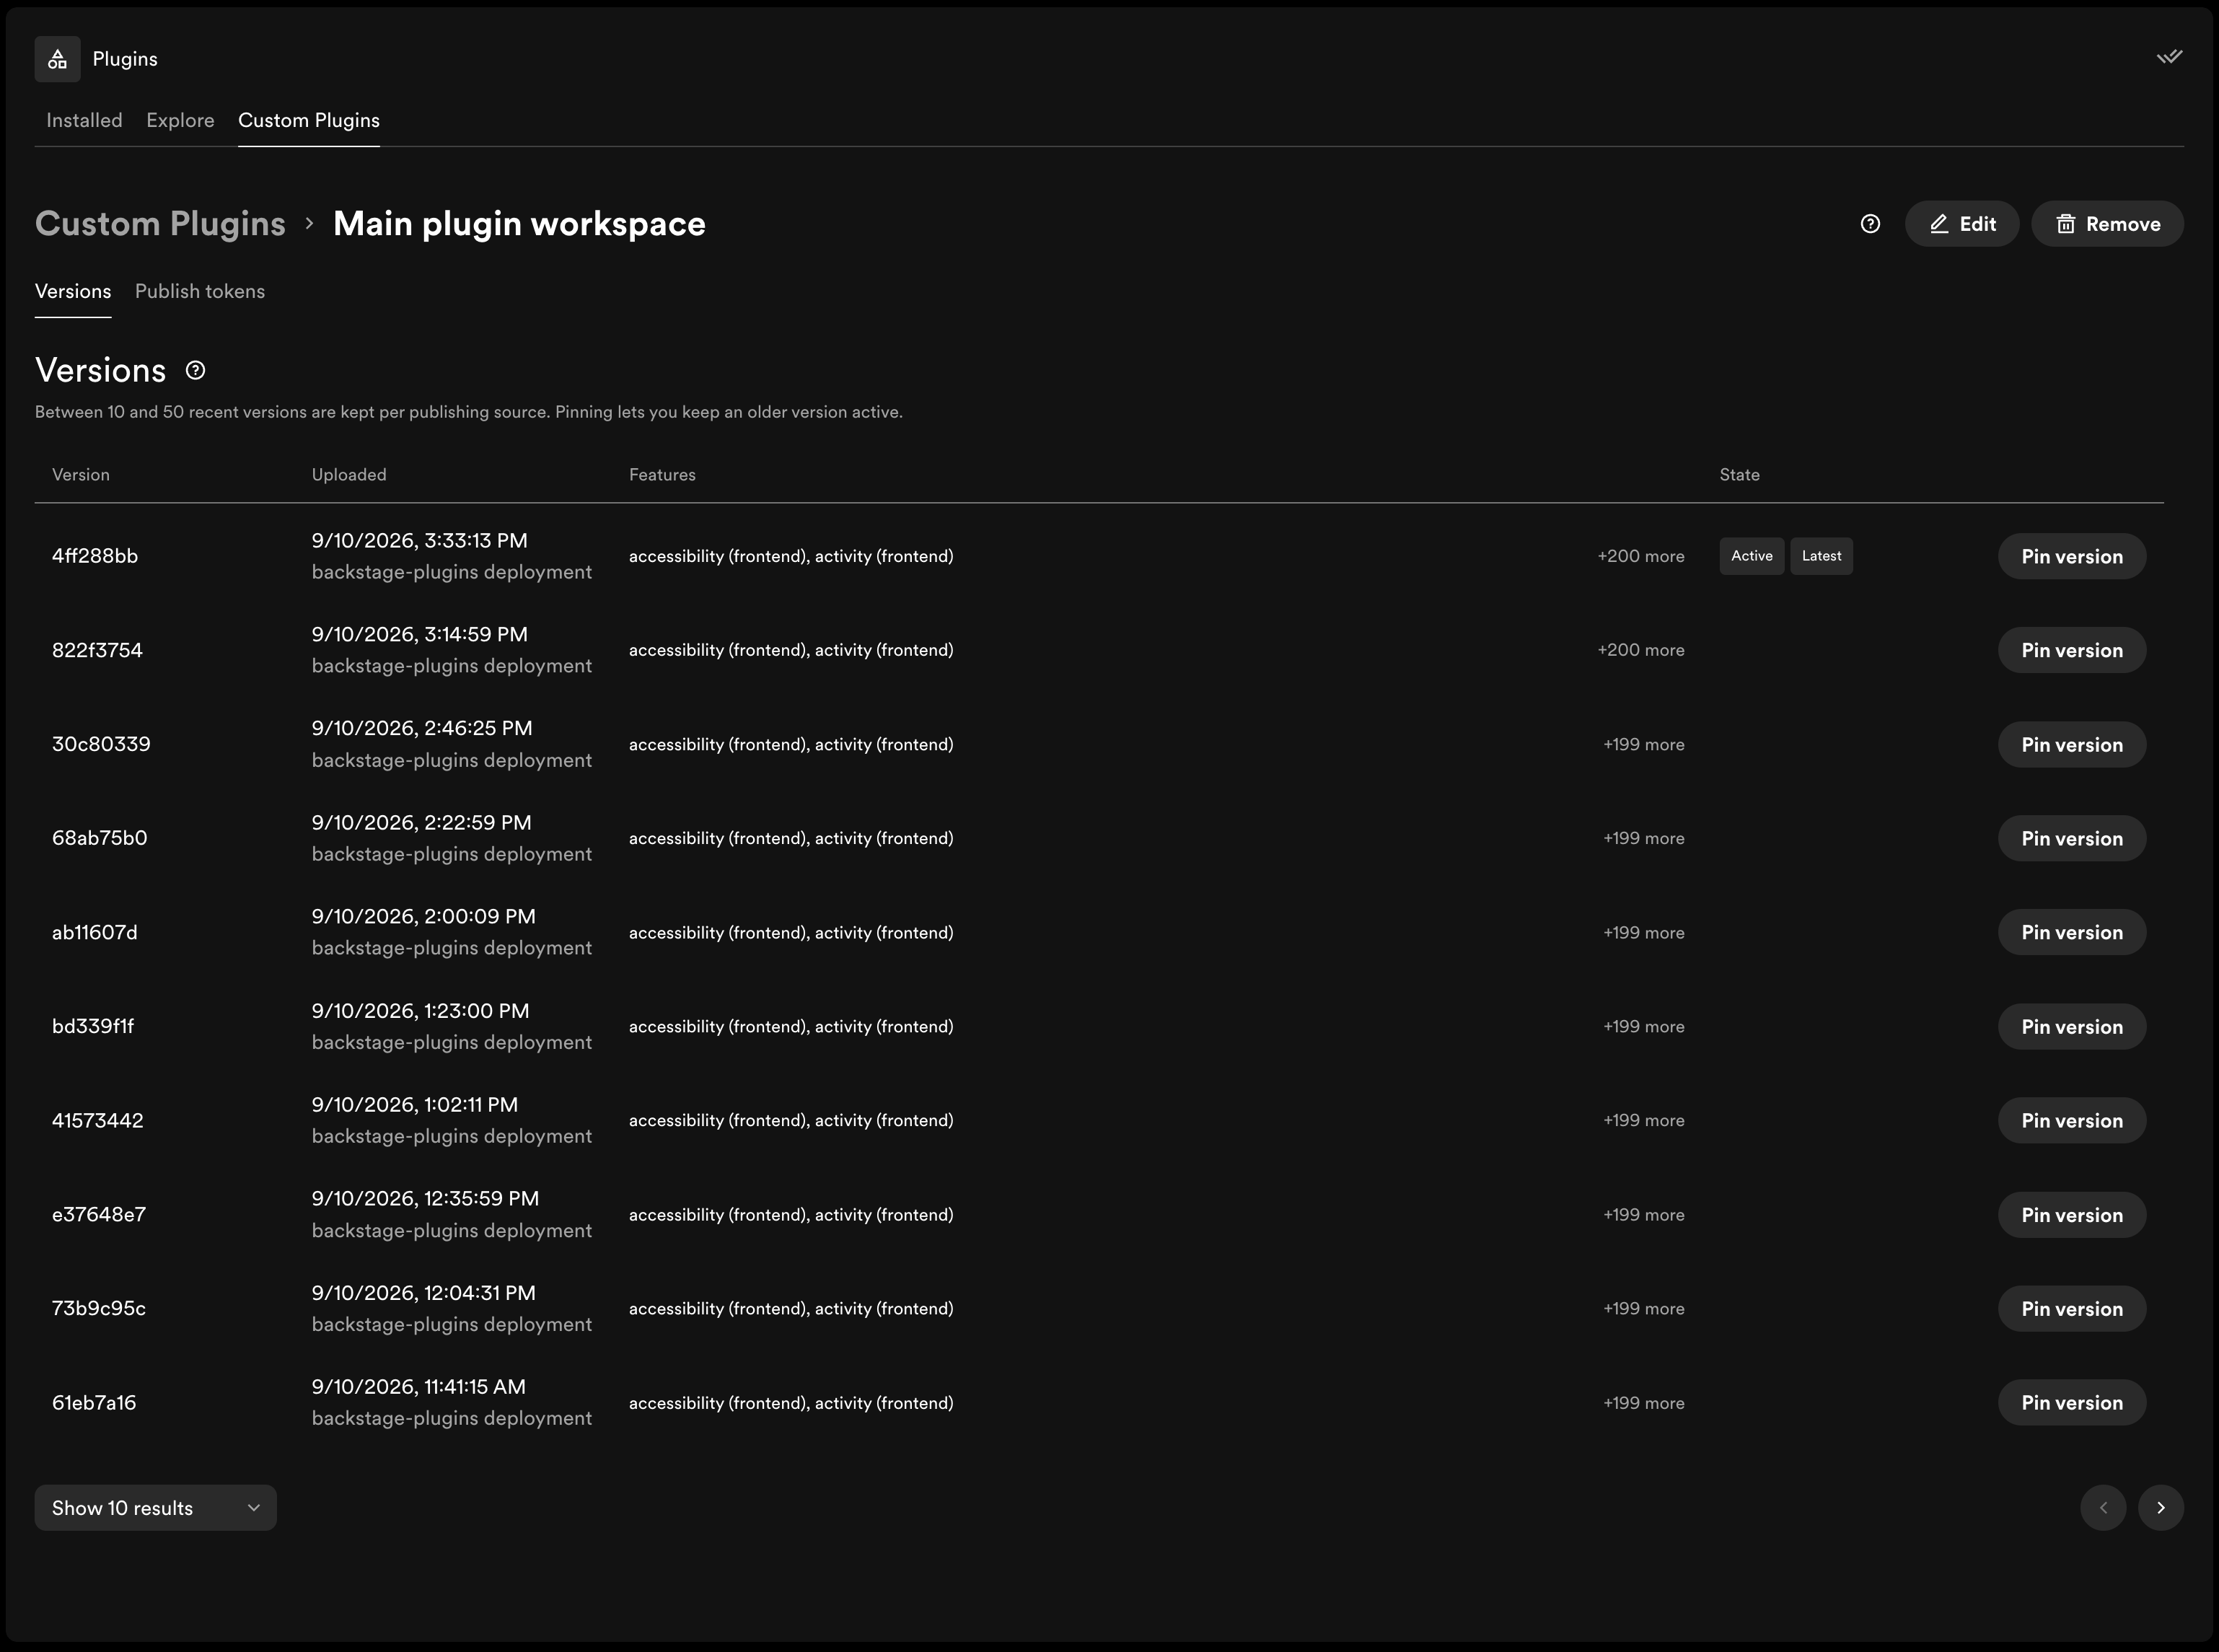
By default, the latest successfully uploaded source version is active. You can pin an older version to roll back or to control when a new release takes effect.
Custom plugins must use Backstage's [new frontend
system](https://backstage.io/docs/frontend-system/) or [new backend
system](https://backstage.io/docs/backend-system/). Run `yarn fix --publish`
in a Backstage workspace to generate and check the package metadata that
Portal uses to discover its features.
## Prepare a plugin workspace
Portal Studio is the recommended way to develop and test custom plugins. It loads local plugin code in your Portal instance while you work, and the workspace it creates already includes the Portal CLI used for publishing.
To create a workspace:
```bash theme={"theme":{"light":"github-light","dark":"dracula"}}
mkdir my-portal-plugins
cd my-portal-plugins
npx @spotify/portal-cli@latest studio init --instance https://example.spotifyportal.com
yarn new
yarn start
```
Open the Bootstrap URL printed by `yarn start` to test the new plugin in Studio Mode. See [Get started with Portal Studio](/docs/portal/portal-plugins/get-started) for prerequisites, existing workspaces, feature selection, and troubleshooting.
You can publish from an existing Backstage workspace as well. Install `@spotify/portal-cli` as a development dependency or invoke the latest version with `npx`. Before publishing, use Studio and the normal checks for that repository to test the exact frontend and backend features you intend to release.
## Create a publishing source
You must be a Portal administrator to create a source and its publishing tokens.
1. Go to **Admin → Plugin Settings → Custom Plugins**.
2. Select **Add source**.
3. Name the source after the workspace or repository it represents, such as `Developer productivity plugins`.
4. Choose whether plugins should start automatically the first time they are published:
* Leave **Start new plugins automatically** off to review and start each new plugin manually after its first publication.
* Turn it on when releases from the workspace are already trusted and tested. This setting only controls the initial state of newly discovered plugins.
5. Select **Create publishing source**.
Sources have a priority order. If two active sources contain the same package, or contain plugin packages with the same plugin ID, the source listed first takes precedence. Keep each package and plugin ID owned by one source whenever possible. If intentional overlap is required, use **Edit priority** on the **Custom Plugins** tab and review any ignored-feature warnings.
## Create and store a publishing token
After creating a source, Portal opens its **Publish tokens** tab.
1. Enter a descriptive token name. Use separate tokens for separate publishers, for example `GitHub Actions production` and `Local development`.
2. Select **Create token**.
3. Copy the token immediately. Portal shows its value only once.
4. Store an automation token in your CI/CD secret store as `PORTAL_PUBLISH_TOKEN`. Do not commit it to the repository, print it in build output, or put it directly in a command that might be retained in shell history.
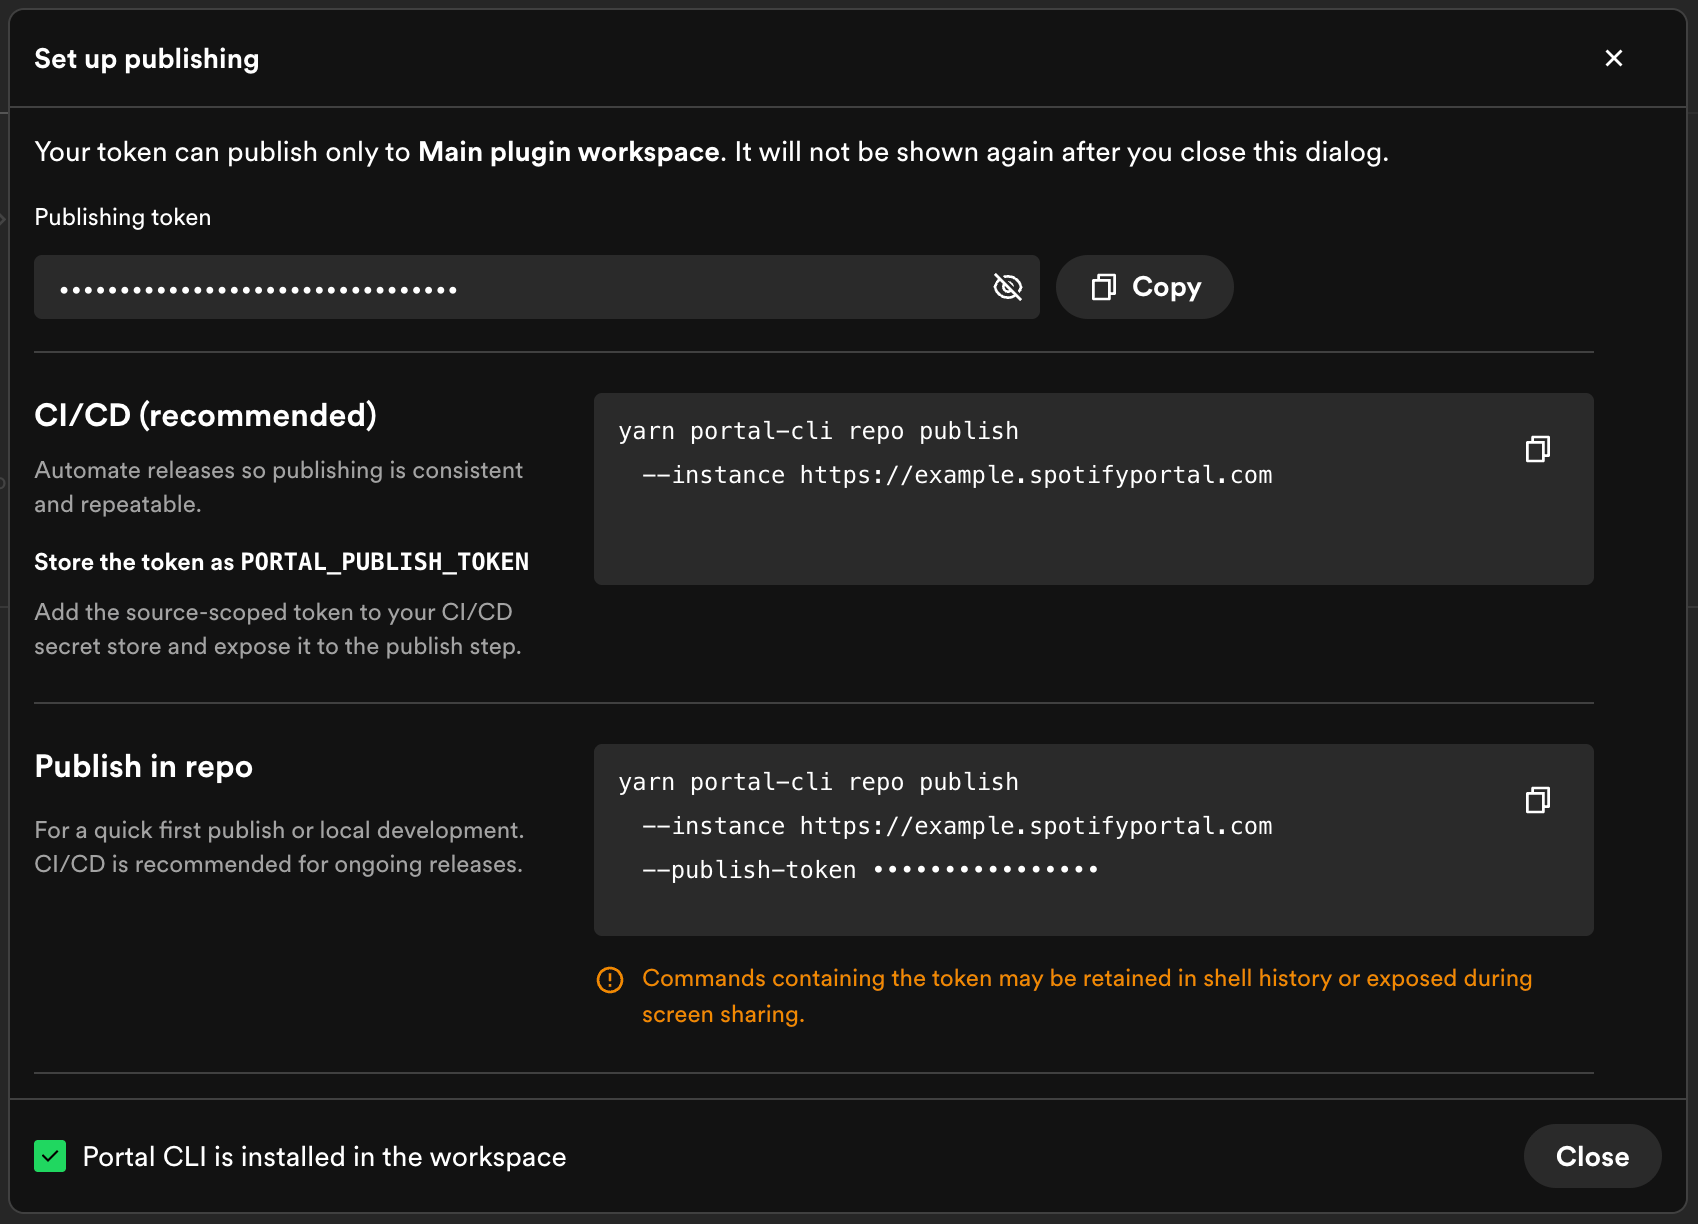 Tokens are scoped to one publishing source. A token can upload new versions to that source, but cannot publish to another source. Portal records when each token was created and last used. Revoke a token from the **Publish tokens** tab when it is no longer needed or might have been exposed.
## Publish from the workspace
If the workspace was created by `studio init`, the Portal CLI is already installed. In an interactive terminal, set the instance and enter the token at a hidden prompt using the example for your shell. Replace `https://example.spotifyportal.com` with the full URL of your Portal instance.
For **Bash or Zsh** (macOS, Linux, WSL, or Git Bash):
```bash theme={"theme":{"light":"github-light","dark":"dracula"}}
export PORTAL_INSTANCE=https://example.spotifyportal.com
printf 'Publishing token: '
read -rs PORTAL_PUBLISH_TOKEN
printf '\n'
export PORTAL_PUBLISH_TOKEN
```
For **PowerShell** (Windows PowerShell 5.1 or PowerShell 7+):
```powershell theme={"theme":{"light":"github-light","dark":"dracula"}}
$env:PORTAL_INSTANCE = 'https://example.spotifyportal.com'
$publishToken = Read-Host 'Publishing token' -AsSecureString
$env:PORTAL_PUBLISH_TOKEN = [System.Net.NetworkCredential]::new('', $publishToken).Password
Remove-Variable publishToken
```
If you use Windows Command Prompt (`cmd.exe`), open PowerShell for these steps. For other shells, use your secret manager to supply `PORTAL_PUBLISH_TOKEN`, or switch to one of the shells above.
These prompts keep the token out of the commands saved in shell history and hide it while you enter it. The CLI still receives the token as a plaintext environment variable, so use a trusted machine and do not print the environment or enable shell tracing. For CI/CD, inject the token from your secret store instead of prompting.
Then publish all compatible plugins in the workspace:
```bash theme={"theme":{"light":"github-light","dark":"dracula"}}
yarn portal-cli repo publish
```
For an existing workspace without the Portal CLI installed, use the same environment setup and run this command instead:
```bash theme={"theme":{"light":"github-light","dark":"dracula"}}
npx @spotify/portal-cli@latest repo publish
```
When you are finished publishing, clear the token with `unset PORTAL_PUBLISH_TOKEN` in Bash/Zsh or `Remove-Item Env:PORTAL_PUBLISH_TOKEN` in PowerShell, or close the terminal session.
The command discovers publishable plugin packages, builds a release, and uploads it to the source associated with the token. It does not publish the packages to npm.
### Select what to publish
With no package selection, `repo publish` includes every compatible plugin package in the workspace. This is the recommended default when one source represents the whole workspace.
During development or for a deliberately partial release, you can select or exclude features:
```bash theme={"theme":{"light":"github-light","dark":"dracula"}}
# Check one plugin locally without uploading it
yarn portal-cli repo publish --dry-run --plugin my-plugin-id
# Publish only packages at the given paths
yarn portal-cli repo publish plugins/my-plugin plugins/my-plugin-backend
# Publish the workspace except an internal development plugin
yarn portal-cli repo publish --exclude-plugin internal-dev
```
Repeat `--plugin`, `--exclude-plugin`, or `--exclude` to select multiple values. Package selections accept package names or workspace-relative paths.
Each upload replaces the complete latest version for that source. A package
omitted from a later publication is not part of that source version. Use
selective publishing only when the resulting release is intentionally
complete.
## Publish from CI/CD
Publishing from the workspace's normal release pipeline keeps Portal aligned with reviewed source changes and makes releases repeatable. The following GitHub Actions example uses the scripts included in a Studio workspace and publishes after changes reach `main`:
```yaml title=".github/workflows/publish-portal-plugins.yaml" theme={"theme":{"light":"github-light","dark":"dracula"}}
name: Publish Portal plugins
on:
push:
branches: [main]
permissions:
contents: read
jobs:
publish:
runs-on: ubuntu-latest
env:
CI: 'true'
steps:
- uses: actions/checkout@v4
- uses: actions/setup-node@v4
with:
node-version: 24
cache: yarn
- run: corepack enable
- run: yarn install --immutable
# Run the checks required by your publishing workflow.
- run: yarn tsc:full
- run: yarn lint:all
- run: yarn test:all
- run: yarn portal-cli repo publish
env:
PORTAL_INSTANCE: https://example.spotifyportal.com
PORTAL_PUBLISH_TOKEN: ${{ secrets.PORTAL_PUBLISH_TOKEN }}
```
Add the token created for the publishing source as the `PORTAL_PUBLISH_TOKEN` repository or environment secret. Adapt the validation commands, branch, runner, and approval rules to your repository. For other CI systems, use the same sequence: install the workspace reproducibly, run its required checks, expose `PORTAL_INSTANCE` and `PORTAL_PUBLISH_TOKEN` only to the publish step, then run `portal-cli repo publish`.
For stronger separation between environments, create a different Portal publishing source and token for each Portal instance. Protect production tokens with your CI system's environment approvals and branch rules.
## Verify and manage a release
After publishing:
1. Open **Admin → Plugin Settings → Custom Plugins** and select the source.
2. Confirm that a new version is listed and open it to review the included and ignored features.
3. If the source does not start new plugins automatically, return to the **Installed** tab and start the new plugin or module.
4. Configure the plugin and exercise its important frontend and backend behavior.
The source follows the latest uploaded version unless an administrator pins an older one. Pin a known-good version to roll back, then unpin it when the latest version is ready to become active again. Portal retains a limited number of recent versions, so a pin is a short-term release control rather than a permanent archive.
Tokens are scoped to one publishing source. A token can upload new versions to that source, but cannot publish to another source. Portal records when each token was created and last used. Revoke a token from the **Publish tokens** tab when it is no longer needed or might have been exposed.
## Publish from the workspace
If the workspace was created by `studio init`, the Portal CLI is already installed. In an interactive terminal, set the instance and enter the token at a hidden prompt using the example for your shell. Replace `https://example.spotifyportal.com` with the full URL of your Portal instance.
For **Bash or Zsh** (macOS, Linux, WSL, or Git Bash):
```bash theme={"theme":{"light":"github-light","dark":"dracula"}}
export PORTAL_INSTANCE=https://example.spotifyportal.com
printf 'Publishing token: '
read -rs PORTAL_PUBLISH_TOKEN
printf '\n'
export PORTAL_PUBLISH_TOKEN
```
For **PowerShell** (Windows PowerShell 5.1 or PowerShell 7+):
```powershell theme={"theme":{"light":"github-light","dark":"dracula"}}
$env:PORTAL_INSTANCE = 'https://example.spotifyportal.com'
$publishToken = Read-Host 'Publishing token' -AsSecureString
$env:PORTAL_PUBLISH_TOKEN = [System.Net.NetworkCredential]::new('', $publishToken).Password
Remove-Variable publishToken
```
If you use Windows Command Prompt (`cmd.exe`), open PowerShell for these steps. For other shells, use your secret manager to supply `PORTAL_PUBLISH_TOKEN`, or switch to one of the shells above.
These prompts keep the token out of the commands saved in shell history and hide it while you enter it. The CLI still receives the token as a plaintext environment variable, so use a trusted machine and do not print the environment or enable shell tracing. For CI/CD, inject the token from your secret store instead of prompting.
Then publish all compatible plugins in the workspace:
```bash theme={"theme":{"light":"github-light","dark":"dracula"}}
yarn portal-cli repo publish
```
For an existing workspace without the Portal CLI installed, use the same environment setup and run this command instead:
```bash theme={"theme":{"light":"github-light","dark":"dracula"}}
npx @spotify/portal-cli@latest repo publish
```
When you are finished publishing, clear the token with `unset PORTAL_PUBLISH_TOKEN` in Bash/Zsh or `Remove-Item Env:PORTAL_PUBLISH_TOKEN` in PowerShell, or close the terminal session.
The command discovers publishable plugin packages, builds a release, and uploads it to the source associated with the token. It does not publish the packages to npm.
### Select what to publish
With no package selection, `repo publish` includes every compatible plugin package in the workspace. This is the recommended default when one source represents the whole workspace.
During development or for a deliberately partial release, you can select or exclude features:
```bash theme={"theme":{"light":"github-light","dark":"dracula"}}
# Check one plugin locally without uploading it
yarn portal-cli repo publish --dry-run --plugin my-plugin-id
# Publish only packages at the given paths
yarn portal-cli repo publish plugins/my-plugin plugins/my-plugin-backend
# Publish the workspace except an internal development plugin
yarn portal-cli repo publish --exclude-plugin internal-dev
```
Repeat `--plugin`, `--exclude-plugin`, or `--exclude` to select multiple values. Package selections accept package names or workspace-relative paths.
Each upload replaces the complete latest version for that source. A package
omitted from a later publication is not part of that source version. Use
selective publishing only when the resulting release is intentionally
complete.
## Publish from CI/CD
Publishing from the workspace's normal release pipeline keeps Portal aligned with reviewed source changes and makes releases repeatable. The following GitHub Actions example uses the scripts included in a Studio workspace and publishes after changes reach `main`:
```yaml title=".github/workflows/publish-portal-plugins.yaml" theme={"theme":{"light":"github-light","dark":"dracula"}}
name: Publish Portal plugins
on:
push:
branches: [main]
permissions:
contents: read
jobs:
publish:
runs-on: ubuntu-latest
env:
CI: 'true'
steps:
- uses: actions/checkout@v4
- uses: actions/setup-node@v4
with:
node-version: 24
cache: yarn
- run: corepack enable
- run: yarn install --immutable
# Run the checks required by your publishing workflow.
- run: yarn tsc:full
- run: yarn lint:all
- run: yarn test:all
- run: yarn portal-cli repo publish
env:
PORTAL_INSTANCE: https://example.spotifyportal.com
PORTAL_PUBLISH_TOKEN: ${{ secrets.PORTAL_PUBLISH_TOKEN }}
```
Add the token created for the publishing source as the `PORTAL_PUBLISH_TOKEN` repository or environment secret. Adapt the validation commands, branch, runner, and approval rules to your repository. For other CI systems, use the same sequence: install the workspace reproducibly, run its required checks, expose `PORTAL_INSTANCE` and `PORTAL_PUBLISH_TOKEN` only to the publish step, then run `portal-cli repo publish`.
For stronger separation between environments, create a different Portal publishing source and token for each Portal instance. Protect production tokens with your CI system's environment approvals and branch rules.
## Verify and manage a release
After publishing:
1. Open **Admin → Plugin Settings → Custom Plugins** and select the source.
2. Confirm that a new version is listed and open it to review the included and ignored features.
3. If the source does not start new plugins automatically, return to the **Installed** tab and start the new plugin or module.
4. Configure the plugin and exercise its important frontend and backend behavior.
The source follows the latest uploaded version unless an administrator pins an older one. Pin a known-good version to roll back, then unpin it when the latest version is ready to become active again. Portal retains a limited number of recent versions, so a pin is a short-term release control rather than a permanent archive.
 Removing a publishing source removes all of its stored versions and tokens and uninstalls its active features. Revoke individual tokens when you only need to remove publishing access.
## Troubleshooting publishing
* **No publishable packages were found:** run `yarn fix --publish`, check the `backstage.role` and `backstage.pluginId` metadata in each package, and confirm that the packages use the new frontend or backend system.
* **The upload is unauthorized:** confirm that `PORTAL_PUBLISH_TOKEN` contains an active token for this exact source and instance. Create a new token if the old value was lost or revoked.
* **The wrong packages are included:** run with `--dry-run`, then use package paths, `--plugin`, `--exclude-plugin`, or `--exclude` to refine the release.
* **A feature is ignored:** check the source version details. Another higher-priority source contains the same package or a plugin package with the same plugin ID.
* **The published plugin does not work:** reproduce the issue in Studio, review the CLI and browser errors, verify the plugin's configuration, and confirm that all required frontend, backend, module, and local library packages are part of the workspace.
If the available information does not resolve the problem, [contact Customer Support](https://backstage.spotify.com/account/support/) with the Portal instance, source name, publication time, relevant package names, and complete error output.
## Using the previous publishing method
If your instance does not yet have the **Custom Plugins** tab, use the [registry publishing instructions](./publishing-plugins). After the tab becomes available, follow [Switching to pre-built plugins](/docs/portal/managing-plugins/migration) to move existing plugins to publishing sources.
Removing a publishing source removes all of its stored versions and tokens and uninstalls its active features. Revoke individual tokens when you only need to remove publishing access.
## Troubleshooting publishing
* **No publishable packages were found:** run `yarn fix --publish`, check the `backstage.role` and `backstage.pluginId` metadata in each package, and confirm that the packages use the new frontend or backend system.
* **The upload is unauthorized:** confirm that `PORTAL_PUBLISH_TOKEN` contains an active token for this exact source and instance. Create a new token if the old value was lost or revoked.
* **The wrong packages are included:** run with `--dry-run`, then use package paths, `--plugin`, `--exclude-plugin`, or `--exclude` to refine the release.
* **A feature is ignored:** check the source version details. Another higher-priority source contains the same package or a plugin package with the same plugin ID.
* **The published plugin does not work:** reproduce the issue in Studio, review the CLI and browser errors, verify the plugin's configuration, and confirm that all required frontend, backend, module, and local library packages are part of the workspace.
If the available information does not resolve the problem, [contact Customer Support](https://backstage.spotify.com/account/support/) with the Portal instance, source name, publication time, relevant package names, and complete error output.
## Using the previous publishing method
If your instance does not yet have the **Custom Plugins** tab, use the [registry publishing instructions](./publishing-plugins). After the tab becomes available, follow [Switching to pre-built plugins](/docs/portal/managing-plugins/migration) to move existing plugins to publishing sources.