> ## Documentation Index
> Fetch the complete documentation index at: https://backstage.spotify.com/docs/llms.txt
> Use this file to discover all available pages before exploring further.
# Build a plugin
> Follow step-by-step guides to build custom Portal plugins, including scaffolder actions, external catalog data sources, and homepage widgets.
## Plugin use cases
Here are a few reference guides on common use cases for creating custom plugins in Portal.
* [Add a custom scaffolder action to software templates](#add-a-custom-scaffolder-action-to-software-templates)
* [Connect & sync software catalog to an external source](#connect-%26-sync-software-catalog-to-an-external-source)
* [Add a custom widget to the homepage](#add-a-custom-widget-to-the-homepage)
* [\[External\] Connect & sync Soundcheck to an external source](https://backstage.spotify.com/docs/plugins/soundcheck/tutorials/custom-fact-collector)
* [\[External\] Connect & sync search to an external source (Confluence)](https://github.com/backstage/community-plugins/tree/main/workspaces/confluence/plugins/search-backend-module-confluence-collator)
## Add a custom scaffolder action to software templates
[Software templates](https://backstage.io/docs/features/software-templates/) allow your developers to start from square *two* when building a new application. Software templates have a series of *actions* – steps that run when using a template. For example, publishing to source control, deleting or renaming files, and registering software in the catalog.
Portal has many built-in actions, but as you explore software templates you may find that you need a **custom action** to perform a step that may be unique to your company. For example, at Spotify we have custom actions to migrate files from one format to another, or to link Google Cloud projects to a software component.
As an example, we’ll create a scaffolder **module** to add a custom action that pings an internal system with the ID of a new component. This might be used to kick off a security review, for instance.
### Before you begin
Verify you’ve set up a Backstage application locally. See the [getting started](./get-started) section for more information.
### 1. Create your plugin
Run the `new` command from the root of your Backstage application. For the first prompt after selecting the `scaffolder-module` type.
```bash theme={"theme":{"light":"github-light","dark":"dracula"}}
$ yarn backstage-cli new
> scaffolder-module - A module exporting custom actions for @backstage/plugin-scaffolder-backend
? Enter the name of the module [required]: pinger
```
This will create a `plugins/scaffolder-backend-module-pinger` folder with the structure of a backend module.
### 2. Modify the example action
The `scaffolder-module` plugin that was created comes with an example custom action. Let’s modify this example slightly to ping an external service with the [entity reference](https://backstage.io/docs/features/software-catalog/references/) that was created by a template that includes this action:
```typescript plugins/scaffolder-backend-module-pinger/src/actions/example.ts theme={"theme":{"light":"github-light","dark":"dracula"}}
import { createTemplateAction } from '@backstage/plugin-scaffolder-node';
export function createPingAction() {
return createTemplateAction<{
entityRef: string;
}>({
id: 'acme:ping',
description: 'Pings an external service',
schema: {
input: {
type: 'object',
required: ['entityRef'],
properties: {
entityRef: {
title: 'An entity reference',
description:
"An entity reference, e.g. 'component:default/my-component'",
type: 'string',
},
},
},
},
async handler(ctx) {
ctx.logger.info(
`Pinging external service for entity: ${ctx.input.entityRef}`,
);
await fetch('https://httpbin.org/post', {
body: JSON.stringify({ entityRef: ctx.input.entityRef }),
method: 'POST',
});
},
});
}
```
Note that this action is using the sample [httpbin](https://httpbin.org/) service for demonstration purposes; typically the fetch URL here would be an internal service at your company.
### 3. Update the backend module
The backend module needs a small update, since we changed the name of the example action:
```typescript plugins/scaffolder-backend-module-pinger/src/module.ts theme={"theme":{"light":"github-light","dark":"dracula"}}
import { createBackendModule } from '@backstage/backend-plugin-api';
import { scaffolderActionsExtensionPoint } from '@backstage/plugin-scaffolder-node/alpha';
import { createExampleAction } from './actions/example'; // [!code --]
import { createPingAction } from './actions/example'; // [!code ++]
/**
* A backend module that registers the action into the scaffolder
*/
export const scaffolderModule = createBackendModule({
moduleId: 'example-action',
pluginId: 'scaffolder',
register({ registerInit }) {
registerInit({
deps: {
scaffolderActions: scaffolderActionsExtensionPoint,
},
async init({ scaffolderActions }) {
scaffolderActions.addActions(createExampleAction()); // [!code --]
scaffolderActions.addActions(createPingAction()); // [!code ++]
},
});
},
});
```
### 4. Install in your Backstage application
Now we can add the plugin to the Backstage application. First, we need to add the dependency to the `backend` package.
**Note:** The `backstage-cli new` command may have already added the plugin as a dependency, so only add this line if needed.
```json title="packages/backend/package.json" theme={"theme":{"light":"github-light","dark":"dracula"}}
{
"name": "backend",
"version": "0.0.0",
"main": "dist/index.cjs.js",
"types": "src/index.ts",
"private": true,
"backstage": {
"role": "backend"
},
"scripts": {
...
},
"dependencies": {
...
"backstage-plugin-scaffolder-backend-module-pinger": "workspace:^", // [!code ++]
}
...
}
```
Next, the plugin can be added to the backend initialization:
```typescript packages/backend/src/index.ts theme={"theme":{"light":"github-light","dark":"dracula"}}
...
backend.add(import('backstage-plugin-scaffolder-backend-module-pinger'));
backend.start();
```
This step of adding the module to the application is only needed in an open-source Backstage application. Portal detects added plugins and wires them up to the application automatically.
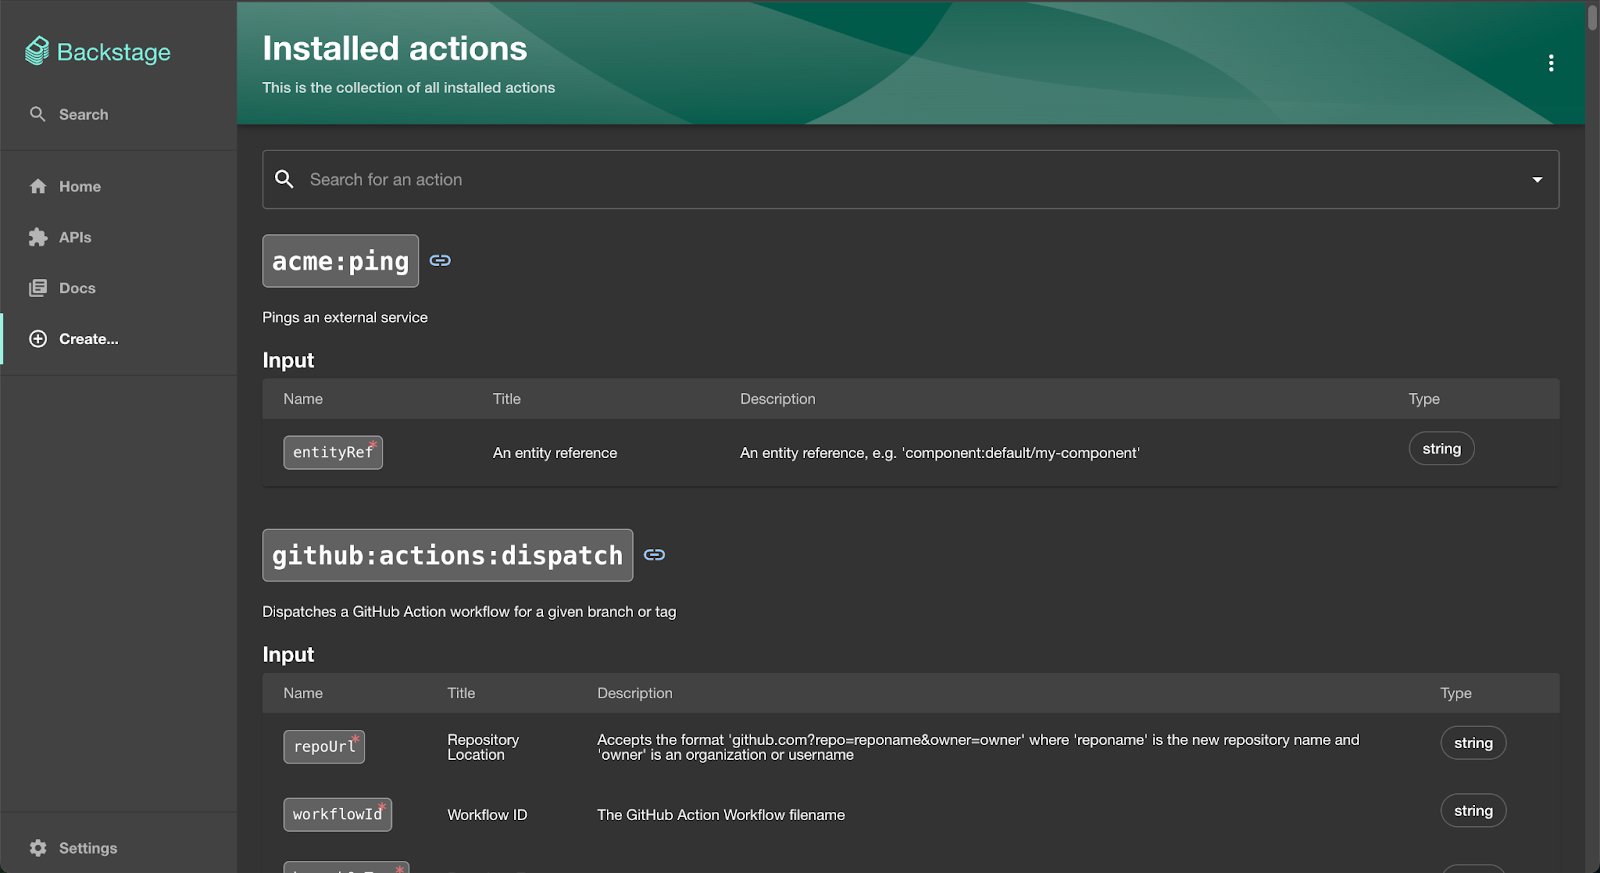
Run `yarn dev` to start up the application. Visit the [scaffolder action list](http://localhost:3000/create/actions) to verify that the new `acme:ping` action is listed.
 ### 5. Use the custom action in a software template
To put this action to use, we can modify the example template that comes with a Backstage application to use the new action. Let’s add the `acme:ping` action after the register step, since we want to use the `entityRef` that the register step outputs:
```yaml title="examples/templates/template.yaml" theme={"theme":{"light":"github-light","dark":"dracula"}}
apiVersion: scaffolder.backstage.io/v1beta3
kind: Template
metadata:
name: example-nodejs-template
title: Example Node.js Template
description: An example template for the scaffolder that creates a simple Node.js service
spec:
owner: user:guest
type: service
parameters: ...
steps:
- id: fetch-base
name: Fetch Base
action: fetch:template
input:
url: ./content
values:
name: ${{ parameters.name }}
# This step publishes the contents of the working directory to GitHub.
- id: publish
name: Publish
action: publish:github
input:
allowedHosts: ['github.com']
description: This is ${{ parameters.name }}
repoUrl: ${{ parameters.repoUrl }}
# The final step is to register our new component in the catalog.
- id: register
name: Register
action: catalog:register
input:
repoContentsUrl: ${{ steps['publish'].output.repoContentsUrl }}
catalogInfoPath: '/catalog-info.yaml'
- id: ping # [!code ++]
name: Ping an external service # [!code ++]
action: acme:ping # [!code ++]
input: # [!code ++]
entityRef: ${{ steps['register'].output.entityRef }} # [!code ++]
# Outputs are displayed to the user after a successful execution of the template.
output: ...
```
Since the example template uses the `publish:github` action, you’ll also need to set up the GitHub integration to see the template work successfully. Follow the [instructions](https://backstage.io/docs/integrations/github/locations) to set up your `app-config.yaml` with a valid GitHub token.
Restart the application with `yarn dev` to ensure the template change is picked up. Go to `Create` in the navigation and select the example template. Fill out the form fields, click `Review` and then `Create` at the end.
The template will execute, showing the new `acme:ping` action as the last step in the template:
### 5. Use the custom action in a software template
To put this action to use, we can modify the example template that comes with a Backstage application to use the new action. Let’s add the `acme:ping` action after the register step, since we want to use the `entityRef` that the register step outputs:
```yaml title="examples/templates/template.yaml" theme={"theme":{"light":"github-light","dark":"dracula"}}
apiVersion: scaffolder.backstage.io/v1beta3
kind: Template
metadata:
name: example-nodejs-template
title: Example Node.js Template
description: An example template for the scaffolder that creates a simple Node.js service
spec:
owner: user:guest
type: service
parameters: ...
steps:
- id: fetch-base
name: Fetch Base
action: fetch:template
input:
url: ./content
values:
name: ${{ parameters.name }}
# This step publishes the contents of the working directory to GitHub.
- id: publish
name: Publish
action: publish:github
input:
allowedHosts: ['github.com']
description: This is ${{ parameters.name }}
repoUrl: ${{ parameters.repoUrl }}
# The final step is to register our new component in the catalog.
- id: register
name: Register
action: catalog:register
input:
repoContentsUrl: ${{ steps['publish'].output.repoContentsUrl }}
catalogInfoPath: '/catalog-info.yaml'
- id: ping # [!code ++]
name: Ping an external service # [!code ++]
action: acme:ping # [!code ++]
input: # [!code ++]
entityRef: ${{ steps['register'].output.entityRef }} # [!code ++]
# Outputs are displayed to the user after a successful execution of the template.
output: ...
```
Since the example template uses the `publish:github` action, you’ll also need to set up the GitHub integration to see the template work successfully. Follow the [instructions](https://backstage.io/docs/integrations/github/locations) to set up your `app-config.yaml` with a valid GitHub token.
Restart the application with `yarn dev` to ensure the template change is picked up. Go to `Create` in the navigation and select the example template. Fill out the form fields, click `Review` and then `Create` at the end.
The template will execute, showing the new `acme:ping` action as the last step in the template:
 ## Connect & sync software catalog to an external source
The [software catalog](https://backstage.io/docs/features/software-catalog/) is at the heart of Portal and Backstage. The software catalog is often populated with software components that have [metadata descriptor](https://backstage.io/docs/features/software-catalog/descriptor-format) files in source control, but it’s not unusual to pull in data from another source — such as an API gateway or another third-party service that tracks software at your company.
As an example, we’ll create a catalog **module** that loads API components from [Apigee](https://cloud.google.com/apigee), an API gateway offered by Google Cloud.
### Before you begin
Verify you’ve set up a Backstage application locally. See the [getting started](./get-started) section for more information.
### 1. Create your plugin
Run the `new` command from the root of your Backstage application. For the first prompt after selecting the `backend-module` type, enter `catalog` for the plugin — this module will extend the catalog (which is itself a plugin!) to pull in data from an external source.
```bash theme={"theme":{"light":"github-light","dark":"dracula"}}
$ yarn backstage-cli new
# Select `backend-module` to create a backend module
> backend-module - A new backend module that extends an existing backend plugin with additional features
? Enter the ID of the plugin [required]: catalog
? Enter the ID of the module [required]: apigee
```
This will create a `plugins/catalog-backend-module-apigee` folder with the structure of a backend module.
### 2. Create a proxy endpoint
To call a third-party service, it’s common to create an endpoint in the Backstage [proxy](https://backstage.io/docs/plugins/proxying/#configuration) that your plugin can call; this way, authentication is handled in configuration.
```yaml title="app-config.yaml" theme={"theme":{"light":"github-light","dark":"dracula"}}
proxy:
endpoints:
'/apigee':
# Note: replace in the target with a Google Cloud project name
target: 'https://apigee.googleapis.com/v1/organizations//apis'
headers:
# APIGEE_TOKEN should be set as an environment variable; you can run the app
# using `APIGEE_TOKEN=xxx yarn dev` or hard-code the token here instead for
# testing purposes.
Authorization: Bearer ${APIGEE_TOKEN}
```
### 3. Create an entity provider
The catalog plugin supports adding [entity providers](https://backstage.io/docs/features/software-catalog/external-integrations/#custom-entity-providers), which can populate the software catalog outside of the normal method of a metadata file in source control.
Create a new source file for the entity provider called `ApigeeEntityProvider.ts`:
```typescript plugins/catalog-backend-module-apigee/src/ApigeeEntityProvider.ts theme={"theme":{"light":"github-light","dark":"dracula"}}
import fetch from 'node-fetch';
import {
ANNOTATION_LOCATION,
ANNOTATION_ORIGIN_LOCATION,
Entity,
} from '@backstage/catalog-model';
import {
AuthService,
DiscoveryService,
SchedulerServiceTaskRunner,
} from '@backstage/backend-plugin-api';
import {
EntityProvider,
EntityProviderConnection,
} from '@backstage/plugin-catalog-node';
type ApigeeApiResponse = {
proxies: {
name: string;
apiProxyType: string;
}[];
};
export class ApigeeEntityProvider implements EntityProvider {
private auth: AuthService;
private connection?: EntityProviderConnection;
private discovery: DiscoveryService;
private taskRunner: SchedulerServiceTaskRunner;
constructor(
taskRunner: SchedulerServiceTaskRunner,
discovery: DiscoveryService,
auth: AuthService,
) {
this.taskRunner = taskRunner;
this.discovery = discovery;
this.auth = auth;
}
getProviderName(): string {
return 'apigee';
}
async connect(connection: EntityProviderConnection): Promise {
this.connection = connection;
await this.taskRunner.run({
id: this.getProviderName(),
fn: async () => {
await this.run();
},
});
}
async run(): Promise {
if (!this.connection) {
throw new Error('Not initialized');
}
// Get a service auth token to call the proxy
const { token } = await this.auth.getPluginRequestToken({
onBehalfOf: await this.auth.getOwnServiceCredentials(),
targetPluginId: 'proxy',
});
const proxyUrl = await this.discovery.getBaseUrl('proxy');
const response = await fetch(`${proxyUrl}/apigee`, {
headers: { Authorization: `Bearer ${token}` },
});
const data = (await response.json()) as ApigeeApiResponse;
const entities: Entity[] = this.convertApiEntities(data);
await this.connection.applyMutation({
type: 'full',
entities: entities.map((entity) => ({
entity,
locationKey: `apigee-provider:${entity.metadata.name}`,
})),
});
}
convertApiEntities(data: ApigeeApiResponse): Entity[] {
return data.proxies.map((proxy) => ({
apiVersion: 'backstage.io/v1alpha1',
kind: 'API',
metadata: {
name: proxy.name,
annotations: {
[ANNOTATION_LOCATION]: `apigee://${proxy.name}`,
[ANNOTATION_ORIGIN_LOCATION]: `apigee://${proxy.name}`,
},
},
spec: {
type: 'apigee',
owner: 'platform-team',
lifecycle: 'production',
description: `Apigee API proxy of type ${proxy.apiProxyType}`,
definition: 'TODO', // TODO: load API definition
},
}));
}
}
```
This entity provider uses the proxy endpoint we created, along with Backstage [service-to-service auth](https://backstage.io/docs/auth/service-to-service-auth/), to call the Apigee API and retrieve a list of API proxies to add to the catalog. API types in Backstage require a `definition` field, which this particular Apigee API doesn’t provide, so this is an exercise for later.
### 4. Register the entity provider in your plugin
Now that the entity provider is created, you can register it in the plugin module using the `catalogProcessingExtensionPoint`:
```typescript plugins/catalog-backend-module-apigee/src/module.ts theme={"theme":{"light":"github-light","dark":"dracula"}}
import {
coreServices,
createBackendModule,
} from '@backstage/backend-plugin-api';
import { catalogProcessingExtensionPoint } from '@backstage/plugin-catalog-node/alpha';
import { ApigeeEntityProvider } from './ApigeeEntityProvider';
export const catalogModuleApigee = createBackendModule({
pluginId: 'catalog',
moduleId: 'apigee',
register(env) {
env.registerInit({
deps: {
auth: coreServices.auth,
catalog: catalogProcessingExtensionPoint,
discovery: coreServices.discovery,
scheduler: coreServices.scheduler,
},
async init({ auth, catalog, discovery, scheduler }) {
const taskRunner = scheduler.createScheduledTaskRunner({
frequency: {
minutes: 1,
},
timeout: { minutes: 5 },
});
catalog.addEntityProvider(
new ApigeeEntityProvider(taskRunner, discovery, auth),
);
},
});
},
});
```
### 5. Install in your Backstage application
Now we have a backend module that registers an entity provider – the last step is to add the plugin to the Backstage application. First, we need to add the dependency to the `backend` package.
**Note**: The `backstage-cli new` command may have already added the plugin as a dependency, so only add this line if needed.
```json title="packages/backend/package.json" theme={"theme":{"light":"github-light","dark":"dracula"}}
{
"name": "backend",
"version": "0.0.0",
"main": "dist/index.cjs.js",
"types": "src/index.ts",
"private": true,
"backstage": {
"role": "backend"
},
"scripts": {
...
},
"dependencies": {
...
"backstage-plugin-catalog-backend-module-apigee": "workspace:^", // [!code ++]
}
...
}
```
Next, the plugin can be added to the backend initialization:
```typescript packages/backend/src/index.ts theme={"theme":{"light":"github-light","dark":"dracula"}}
...
backend.add(import('backstage-plugin-catalog-backend-module-apigee'));
backend.start();
```
This final step of adding the module to the application is only needed in an open-source Backstage application. Portal detects added plugins and wires them up to the application automatically.
Run `yarn dev` to start up the application and verify that the API entities from Apigee appear in the catalog. The software catalog view defaults to `Components`, so make sure to switch to the `API` kind to see the new entities.
## Add a custom widget to the homepage
The Portal [homepage](/portal/core-features-and-plugins/home) is built from widgets — self-contained cards that surface information on the dashboard. Plugins can contribute their own widgets using the `HomePageWidgetBlueprint` from `@backstage/plugin-home-react/alpha`. Custom widgets appear alongside the built-in ones and can be managed by Portal admins through the **Manage Homepage** menu.
The blueprint uses an absolute attachment point, so widgets from **any** plugin automatically attach to the homepage. You do not need to create a module specifically for the `home` plugin — widgets are simply included as extensions in your own plugin.
As an example, we'll create a frontend plugin that contributes a "Team Announcements" widget to the homepage.
### Before you begin
Verify you've set up a Backstage application locally. See the [getting started](./get-started) section for more information.
### 1. Create your plugin
Run the `new` command from the root of your Backstage application and select the `plugin` type:
```bash theme={"theme":{"light":"github-light","dark":"dracula"}}
$ yarn backstage-cli new
> plugin - A new frontend plugin
? Enter the name of the plugin [required]: team-announcements
```
This will create a `plugins/team-announcements` folder with the structure of a frontend plugin.
If you already have a frontend plugin and just want to add a widget to it,
skip this step and add the widget extension to your existing plugin's
`extensions` array.
### 2. Define the widget
Use the `HomePageWidgetBlueprint` to create a widget extension. The blueprint requires a `components` callback that returns at least a `Content` component.
```typescript plugins/team-announcements/src/plugin.ts theme={"theme":{"light":"github-light","dark":"dracula"}}
import { createFrontendPlugin } from '@backstage/frontend-plugin-api';
import { HomePageWidgetBlueprint } from '@backstage/plugin-home-react/alpha';
const teamAnnouncementsWidget = HomePageWidgetBlueprint.make({
name: 'team-announcements',
params: {
title: 'Team Announcements',
description: 'Displays the latest announcements from your team',
components: () =>
import('./components/AnnouncementsContent').then((m) => ({
Content: m.AnnouncementsContent,
})),
layout: {
width: { defaultColumns: 2 },
height: { defaultRows: 2 },
},
},
});
export default createFrontendPlugin({
pluginId: 'team-announcements',
extensions: [teamAnnouncementsWidget],
});
```
The key parameters are:
| Parameter | Required | Description |
| ------------- | -------- | -------------------------------------------------------------------------------------------------------------- |
| `name` | No | A unique name for the widget within this plugin. Used in the extension ID. |
| `title` | No | Display title shown in the widget catalog and the admin management UI. |
| `description` | No | Description shown in the admin management UI. |
| `components` | Yes | Async function returning at least a `Content` component. Can also return a `ContextProvider` for shared state. |
| `layout` | No | Size hints for the homepage grid. See [Layout properties](#layout-properties). |
### 3. Implement the Content component
The `Content` component is a regular React component. It can use Backstage APIs via `useApi` and any other React patterns.
```tsx plugins/team-announcements/src/components/AnnouncementsContent.tsx theme={"theme":{"light":"github-light","dark":"dracula"}}
import {
useApi,
fetchApiRef,
discoveryApiRef,
} from '@backstage/core-plugin-api';
import { useState, useEffect } from 'react';
interface Announcement {
id: string;
title: string;
date: string;
}
export function AnnouncementsContent() {
const fetchApi = useApi(fetchApiRef);
const discoveryApi = useApi(discoveryApiRef);
const [announcements, setAnnouncements] = useState([]);
useEffect(() => {
const load = async () => {
const baseUrl = await discoveryApi.getBaseUrl('announcements');
const response = await fetchApi.fetch(`${baseUrl}/latest`);
if (response.ok) {
setAnnouncements(await response.json());
}
};
load();
}, [fetchApi, discoveryApi]);
if (announcements.length === 0) {
return
## Connect & sync software catalog to an external source
The [software catalog](https://backstage.io/docs/features/software-catalog/) is at the heart of Portal and Backstage. The software catalog is often populated with software components that have [metadata descriptor](https://backstage.io/docs/features/software-catalog/descriptor-format) files in source control, but it’s not unusual to pull in data from another source — such as an API gateway or another third-party service that tracks software at your company.
As an example, we’ll create a catalog **module** that loads API components from [Apigee](https://cloud.google.com/apigee), an API gateway offered by Google Cloud.
### Before you begin
Verify you’ve set up a Backstage application locally. See the [getting started](./get-started) section for more information.
### 1. Create your plugin
Run the `new` command from the root of your Backstage application. For the first prompt after selecting the `backend-module` type, enter `catalog` for the plugin — this module will extend the catalog (which is itself a plugin!) to pull in data from an external source.
```bash theme={"theme":{"light":"github-light","dark":"dracula"}}
$ yarn backstage-cli new
# Select `backend-module` to create a backend module
> backend-module - A new backend module that extends an existing backend plugin with additional features
? Enter the ID of the plugin [required]: catalog
? Enter the ID of the module [required]: apigee
```
This will create a `plugins/catalog-backend-module-apigee` folder with the structure of a backend module.
### 2. Create a proxy endpoint
To call a third-party service, it’s common to create an endpoint in the Backstage [proxy](https://backstage.io/docs/plugins/proxying/#configuration) that your plugin can call; this way, authentication is handled in configuration.
```yaml title="app-config.yaml" theme={"theme":{"light":"github-light","dark":"dracula"}}
proxy:
endpoints:
'/apigee':
# Note: replace in the target with a Google Cloud project name
target: 'https://apigee.googleapis.com/v1/organizations//apis'
headers:
# APIGEE_TOKEN should be set as an environment variable; you can run the app
# using `APIGEE_TOKEN=xxx yarn dev` or hard-code the token here instead for
# testing purposes.
Authorization: Bearer ${APIGEE_TOKEN}
```
### 3. Create an entity provider
The catalog plugin supports adding [entity providers](https://backstage.io/docs/features/software-catalog/external-integrations/#custom-entity-providers), which can populate the software catalog outside of the normal method of a metadata file in source control.
Create a new source file for the entity provider called `ApigeeEntityProvider.ts`:
```typescript plugins/catalog-backend-module-apigee/src/ApigeeEntityProvider.ts theme={"theme":{"light":"github-light","dark":"dracula"}}
import fetch from 'node-fetch';
import {
ANNOTATION_LOCATION,
ANNOTATION_ORIGIN_LOCATION,
Entity,
} from '@backstage/catalog-model';
import {
AuthService,
DiscoveryService,
SchedulerServiceTaskRunner,
} from '@backstage/backend-plugin-api';
import {
EntityProvider,
EntityProviderConnection,
} from '@backstage/plugin-catalog-node';
type ApigeeApiResponse = {
proxies: {
name: string;
apiProxyType: string;
}[];
};
export class ApigeeEntityProvider implements EntityProvider {
private auth: AuthService;
private connection?: EntityProviderConnection;
private discovery: DiscoveryService;
private taskRunner: SchedulerServiceTaskRunner;
constructor(
taskRunner: SchedulerServiceTaskRunner,
discovery: DiscoveryService,
auth: AuthService,
) {
this.taskRunner = taskRunner;
this.discovery = discovery;
this.auth = auth;
}
getProviderName(): string {
return 'apigee';
}
async connect(connection: EntityProviderConnection): Promise {
this.connection = connection;
await this.taskRunner.run({
id: this.getProviderName(),
fn: async () => {
await this.run();
},
});
}
async run(): Promise {
if (!this.connection) {
throw new Error('Not initialized');
}
// Get a service auth token to call the proxy
const { token } = await this.auth.getPluginRequestToken({
onBehalfOf: await this.auth.getOwnServiceCredentials(),
targetPluginId: 'proxy',
});
const proxyUrl = await this.discovery.getBaseUrl('proxy');
const response = await fetch(`${proxyUrl}/apigee`, {
headers: { Authorization: `Bearer ${token}` },
});
const data = (await response.json()) as ApigeeApiResponse;
const entities: Entity[] = this.convertApiEntities(data);
await this.connection.applyMutation({
type: 'full',
entities: entities.map((entity) => ({
entity,
locationKey: `apigee-provider:${entity.metadata.name}`,
})),
});
}
convertApiEntities(data: ApigeeApiResponse): Entity[] {
return data.proxies.map((proxy) => ({
apiVersion: 'backstage.io/v1alpha1',
kind: 'API',
metadata: {
name: proxy.name,
annotations: {
[ANNOTATION_LOCATION]: `apigee://${proxy.name}`,
[ANNOTATION_ORIGIN_LOCATION]: `apigee://${proxy.name}`,
},
},
spec: {
type: 'apigee',
owner: 'platform-team',
lifecycle: 'production',
description: `Apigee API proxy of type ${proxy.apiProxyType}`,
definition: 'TODO', // TODO: load API definition
},
}));
}
}
```
This entity provider uses the proxy endpoint we created, along with Backstage [service-to-service auth](https://backstage.io/docs/auth/service-to-service-auth/), to call the Apigee API and retrieve a list of API proxies to add to the catalog. API types in Backstage require a `definition` field, which this particular Apigee API doesn’t provide, so this is an exercise for later.
### 4. Register the entity provider in your plugin
Now that the entity provider is created, you can register it in the plugin module using the `catalogProcessingExtensionPoint`:
```typescript plugins/catalog-backend-module-apigee/src/module.ts theme={"theme":{"light":"github-light","dark":"dracula"}}
import {
coreServices,
createBackendModule,
} from '@backstage/backend-plugin-api';
import { catalogProcessingExtensionPoint } from '@backstage/plugin-catalog-node/alpha';
import { ApigeeEntityProvider } from './ApigeeEntityProvider';
export const catalogModuleApigee = createBackendModule({
pluginId: 'catalog',
moduleId: 'apigee',
register(env) {
env.registerInit({
deps: {
auth: coreServices.auth,
catalog: catalogProcessingExtensionPoint,
discovery: coreServices.discovery,
scheduler: coreServices.scheduler,
},
async init({ auth, catalog, discovery, scheduler }) {
const taskRunner = scheduler.createScheduledTaskRunner({
frequency: {
minutes: 1,
},
timeout: { minutes: 5 },
});
catalog.addEntityProvider(
new ApigeeEntityProvider(taskRunner, discovery, auth),
);
},
});
},
});
```
### 5. Install in your Backstage application
Now we have a backend module that registers an entity provider – the last step is to add the plugin to the Backstage application. First, we need to add the dependency to the `backend` package.
**Note**: The `backstage-cli new` command may have already added the plugin as a dependency, so only add this line if needed.
```json title="packages/backend/package.json" theme={"theme":{"light":"github-light","dark":"dracula"}}
{
"name": "backend",
"version": "0.0.0",
"main": "dist/index.cjs.js",
"types": "src/index.ts",
"private": true,
"backstage": {
"role": "backend"
},
"scripts": {
...
},
"dependencies": {
...
"backstage-plugin-catalog-backend-module-apigee": "workspace:^", // [!code ++]
}
...
}
```
Next, the plugin can be added to the backend initialization:
```typescript packages/backend/src/index.ts theme={"theme":{"light":"github-light","dark":"dracula"}}
...
backend.add(import('backstage-plugin-catalog-backend-module-apigee'));
backend.start();
```
This final step of adding the module to the application is only needed in an open-source Backstage application. Portal detects added plugins and wires them up to the application automatically.
Run `yarn dev` to start up the application and verify that the API entities from Apigee appear in the catalog. The software catalog view defaults to `Components`, so make sure to switch to the `API` kind to see the new entities.
## Add a custom widget to the homepage
The Portal [homepage](/portal/core-features-and-plugins/home) is built from widgets — self-contained cards that surface information on the dashboard. Plugins can contribute their own widgets using the `HomePageWidgetBlueprint` from `@backstage/plugin-home-react/alpha`. Custom widgets appear alongside the built-in ones and can be managed by Portal admins through the **Manage Homepage** menu.
The blueprint uses an absolute attachment point, so widgets from **any** plugin automatically attach to the homepage. You do not need to create a module specifically for the `home` plugin — widgets are simply included as extensions in your own plugin.
As an example, we'll create a frontend plugin that contributes a "Team Announcements" widget to the homepage.
### Before you begin
Verify you've set up a Backstage application locally. See the [getting started](./get-started) section for more information.
### 1. Create your plugin
Run the `new` command from the root of your Backstage application and select the `plugin` type:
```bash theme={"theme":{"light":"github-light","dark":"dracula"}}
$ yarn backstage-cli new
> plugin - A new frontend plugin
? Enter the name of the plugin [required]: team-announcements
```
This will create a `plugins/team-announcements` folder with the structure of a frontend plugin.
If you already have a frontend plugin and just want to add a widget to it,
skip this step and add the widget extension to your existing plugin's
`extensions` array.
### 2. Define the widget
Use the `HomePageWidgetBlueprint` to create a widget extension. The blueprint requires a `components` callback that returns at least a `Content` component.
```typescript plugins/team-announcements/src/plugin.ts theme={"theme":{"light":"github-light","dark":"dracula"}}
import { createFrontendPlugin } from '@backstage/frontend-plugin-api';
import { HomePageWidgetBlueprint } from '@backstage/plugin-home-react/alpha';
const teamAnnouncementsWidget = HomePageWidgetBlueprint.make({
name: 'team-announcements',
params: {
title: 'Team Announcements',
description: 'Displays the latest announcements from your team',
components: () =>
import('./components/AnnouncementsContent').then((m) => ({
Content: m.AnnouncementsContent,
})),
layout: {
width: { defaultColumns: 2 },
height: { defaultRows: 2 },
},
},
});
export default createFrontendPlugin({
pluginId: 'team-announcements',
extensions: [teamAnnouncementsWidget],
});
```
The key parameters are:
| Parameter | Required | Description |
| ------------- | -------- | -------------------------------------------------------------------------------------------------------------- |
| `name` | No | A unique name for the widget within this plugin. Used in the extension ID. |
| `title` | No | Display title shown in the widget catalog and the admin management UI. |
| `description` | No | Description shown in the admin management UI. |
| `components` | Yes | Async function returning at least a `Content` component. Can also return a `ContextProvider` for shared state. |
| `layout` | No | Size hints for the homepage grid. See [Layout properties](#layout-properties). |
### 3. Implement the Content component
The `Content` component is a regular React component. It can use Backstage APIs via `useApi` and any other React patterns.
```tsx plugins/team-announcements/src/components/AnnouncementsContent.tsx theme={"theme":{"light":"github-light","dark":"dracula"}}
import {
useApi,
fetchApiRef,
discoveryApiRef,
} from '@backstage/core-plugin-api';
import { useState, useEffect } from 'react';
interface Announcement {
id: string;
title: string;
date: string;
}
export function AnnouncementsContent() {
const fetchApi = useApi(fetchApiRef);
const discoveryApi = useApi(discoveryApiRef);
const [announcements, setAnnouncements] = useState([]);
useEffect(() => {
const load = async () => {
const baseUrl = await discoveryApi.getBaseUrl('announcements');
const response = await fetchApi.fetch(`${baseUrl}/latest`);
if (response.ok) {
setAnnouncements(await response.json());
}
};
load();
}, [fetchApi, discoveryApi]);
if (announcements.length === 0) {
return No announcements.
;
}
return (
{announcements.map((a) => (
-
{a.title} — {a.date}
))}
);
}
```
### 4. Install and test
Add the plugin dependency to your workspace (if the `new` command did not do it already):
```json title="packages/app/package.json" theme={"theme":{"light":"github-light","dark":"dracula"}}
{
"dependencies": {
"backstage-plugin-team-announcements": "workspace:^"
}
}
```
Start Portal Studio to test the widget:
```bash theme={"theme":{"light":"github-light","dark":"dracula"}}
yarn start
```
Open the Bootstrap URL and navigate to the homepage. The new widget should appear in the grid. Portal admins can show, hide, reorder, and resize it through the **Manage Homepage** menu.
This step of manually adding the dependency is only needed in a local
Backstage application. Portal detects added plugins and wires them up
automatically.
### Using a ContextProvider
If your widget needs shared state — for example, a data-fetching context that avoids redundant requests — return a `ContextProvider` alongside `Content`:
```typescript theme={"theme":{"light":"github-light","dark":"dracula"}}
components: () =>
import('./components/Announcements').then(m => ({
Content: m.AnnouncementsContent,
ContextProvider: m.AnnouncementsProvider,
})),
```
The `ContextProvider` wraps the `Content` component, so any React context values it provides are available inside `Content`.
### Layout properties
The `layout` parameter controls how the widget is sized in the homepage grid. The grid has 3 columns.
| Property | Description |
| ---------------------- | ---------------------------------------------------- |
| `width.defaultColumns` | Initial column span (1–3). Defaults to 1. |
| `width.minColumns` | Minimum column span, enforced during admin resizing. |
| `width.maxColumns` | Maximum column span, enforced during admin resizing. |
| `height.defaultRows` | Initial row span. Defaults to 1. |
| `height.minRows` | Minimum row span, enforced during admin resizing. |
| `height.maxRows` | Maximum row span, enforced during admin resizing. |
Admins can override the default size through the drag-and-drop layout editor. The `min` and `max` constraints prevent the widget from being resized beyond its supported range.