> ## Documentation Index
> Fetch the complete documentation index at: https://backstage.spotify.com/docs/llms.txt
> Use this file to discover all available pages before exploring further.
# Installation & Setup
> Install and configure the Soundcheck backend and frontend plugins in your Backstage instance, including package dependencies, database setup, and UI integration.
## Backend Setup
The next steps describe how to install the Soundcheck backend plugin.
### Install the backend package
Add the Soundcheck packages as dependencies to your Backstage instance
```sh theme={"theme":{"light":"github-light","dark":"dracula"}}
yarn workspace backend add @spotify/backstage-plugin-soundcheck-backend
```
### Setup Soundcheck backend
The Soundcheck backend handles the ingestion of check results in the database,
and serves data to the Soundcheck UI.
You can integrate the Soundcheck backend plugin with your Backstage backend like this:
```ts packages/backend/src/index.ts highlight={6} theme={"theme":{"light":"github-light","dark":"dracula"}}
import { createBackend } from '@backstage/backend-defaults';
const backend = createBackend();
backend.add(import('@backstage/plugin-app-backend/alpha'));
backend.add(import('@spotify/backstage-plugin-soundcheck-backend'));
// ...
backend.start();
```
## Frontend Setup
### Install Backstage UI
Soundcheck now uses [Backstage UI](https://ui.backstage.io/) for a majority of its front-end features, with plans to eventually be on Backstage UI completely and drop the dependency on Material UI.
Please ensure that Backstage UI is installed and up-to-date according to these [instructions](https://ui.backstage.io/install).
#### Custom Theming
Please follow these [instructions](https://backstage.io/docs/conf/user-interface/) for custom theming.
Currently in Soundcheck, most pages use Backstage UI. Features that still use Material UI and are lacking Backstage UI versions are:
1. Classic Overview Page
2. Create/Edit/Configure Pages
3. Entity Card and Tab
### Install the frontend packages
```sh theme={"theme":{"light":"github-light","dark":"dracula"}}
yarn workspace app add @spotify/backstage-plugin-soundcheck
```
### Setup the Soundcheck Entity Content Page & Card
The Soundcheck Entity Page consists of a view on the [Catalog Entity page](https://github.com/backstage/backstage/blob/master/packages/app/src/components/catalog/EntityPage.tsx), and lists
all the related certifications, levels, checks and check results for a
particular entity.
The code below adds the Soundcheck card to the overview tab for all component types.
The Soundcheck entity content component needs to be added to each relevant
page type within your Backstage `EntityPage`. The snippets below insert the
card/tabs at the end of their respective containers, but it's fine to reorder
them as you wish. When reordering the card in particular, consider whether the
[fluid layout](https://v4.mui.com/components/grid/#fluid-grids) of the grid
should be adjusted to ensure the cards fill each row.
```tsx packages/app/src/components/catalog/EntityPage.tsx highlight={2-5,13-15,26-28} theme={"theme":{"light":"github-light","dark":"dracula"}}
...
import {
EntitySoundcheckContent,
EntitySoundcheckCard,
} from '@spotify/backstage-plugin-soundcheck';
...
const overviewContent = (
{/* existing cards... */}
);
...
// Repeat this for all component entity pages which use the `overviewContent`
const serviceEntityPage = (
{/* existing tabs... */}
);
```
### Setup Soundcheck Routing Page
Add a new Route element with the path `/soundcheck` and element of ``.
`` supports the following props:
```tsx theme={"theme":{"light":"github-light","dark":"dracula"}}
{
title: string; // OPTIONAL - Defaults to 'Soundcheck' when excluded
}
```
The route should look something like this:
```tsx packages/app/src/App.tsx highlight={1,8-11} theme={"theme":{"light":"github-light","dark":"dracula"}}
import { SoundcheckRoutingPage } from '@spotify/backstage-plugin-soundcheck';
...
const routes = (
{/* existing routes... */}
}
/>
);
```
### Add a sidebar item
Add a sidebar menu item that routes to the path setup in the previous step
```tsx packages/app/src/components/Root.tsx highlight={1,13} theme={"theme":{"light":"github-light","dark":"dracula"}}
import DoneAllIcon from '@material-ui/icons/DoneAll';
...
export const Root = ({ children }: PropsWithChildren<{}>) => (
{/* existing sidebar items... */}
{/* existing sidebar items... */}
);
```
### Install Soundcheck Group Content Page
The Soundcheck Group Content Page is a Soundcheck Overview Page that can be pinned to a selected group entity.
It can only be added to a group page type within your Backstage `EntityPage`.
```tsx packages/app/src/components/catalog/EntityPage.tsx highlight={1,7-9} theme={"theme":{"light":"github-light","dark":"dracula"}}
import { GroupSoundcheckContent } from '@spotify/backstage-plugin-soundcheck';
const groupPage = (
{/* existing tabs... */}
);
```
### Add Group Certifications alongside Group Overview
For group entities, you can display both the Soundcheck Overview page (`GroupSoundcheckContent`) and the group's applicable tracks/certifications (`EntitySoundcheckContent`) by adding them as separate routes with different paths.
```tsx packages/app/src/components/catalog/EntityPage.tsx highlight={1-4,10-16} theme={"theme":{"light":"github-light","dark":"dracula"}}
import {
GroupSoundcheckContent,
EntitySoundcheckContent,
} from '@spotify/backstage-plugin-soundcheck';
const groupPage = (
{/* existing tabs... */}
);
```
This configuration allows you to:
* View the Soundcheck Overview page (showing checks for group-owned entities) at the `/soundcheck-overview` route
* View tracks applicable directly to the group entity at the `/soundcheck` route
Both components can coexist on the same group entity page without conflicts.
### Check everything is working
If you have followed all steps up to this point, Soundcheck is set up and running. The backend successfully starts up if the program config is valid, and when you navigate to a catalog page for one of the entity types you configured above, you'll see the Soundcheck tab containing the applicable tracks for the current entity. If you visit `/soundcheck` or click the "Soundcheck" entry on the sidebar, you should see the overview page.
## Configure Access Controls
Soundcheck's No-Code UI integrates with Backstage's permission framework and the [RBAC plugin](https://backstage.spotify.com/plugins/rbac/). This integration enables restricting which users/groups can Create, Read, Update, or Delete (CRUD) Soundcheck checks and tracks.
The recommended approaches to setting access controls for this plugin require the Backstage permissions framework. You may have set this up already when configuring other plugins from the Spotify bundle, but if not, [follow this guide to setting up the permissions framework](https://backstage.io/docs/permissions/overview).
### Option 1: Using the RBAC plugin (Recommended)
*"The [RBAC plugin](https://backstage.spotify.com/plugins/rbac) is a no-code management UI for restricting access to plugins, routes, and data within Backstage. Admins can quickly define roles, assign users and groups, and configure permissions to encode authorization decisions according to your organization's evolving security and compliance needs."*
To have access to Soundcheck permissions within the RBAC UI, be sure to add `soundcheck` to the list of `permissionedPlugins` in your `app-config.yaml`.
```yaml app-config.yaml highlight={6} theme={"theme":{"light":"github-light","dark":"dracula"}}
permission:
enabled: true
permissionedPlugins:
- catalog
- scaffolder
- soundcheck
...
```
Using the [RBAC plugin](../rbac/), it's easy to define access to Soundcheck by selecting the permission you want.
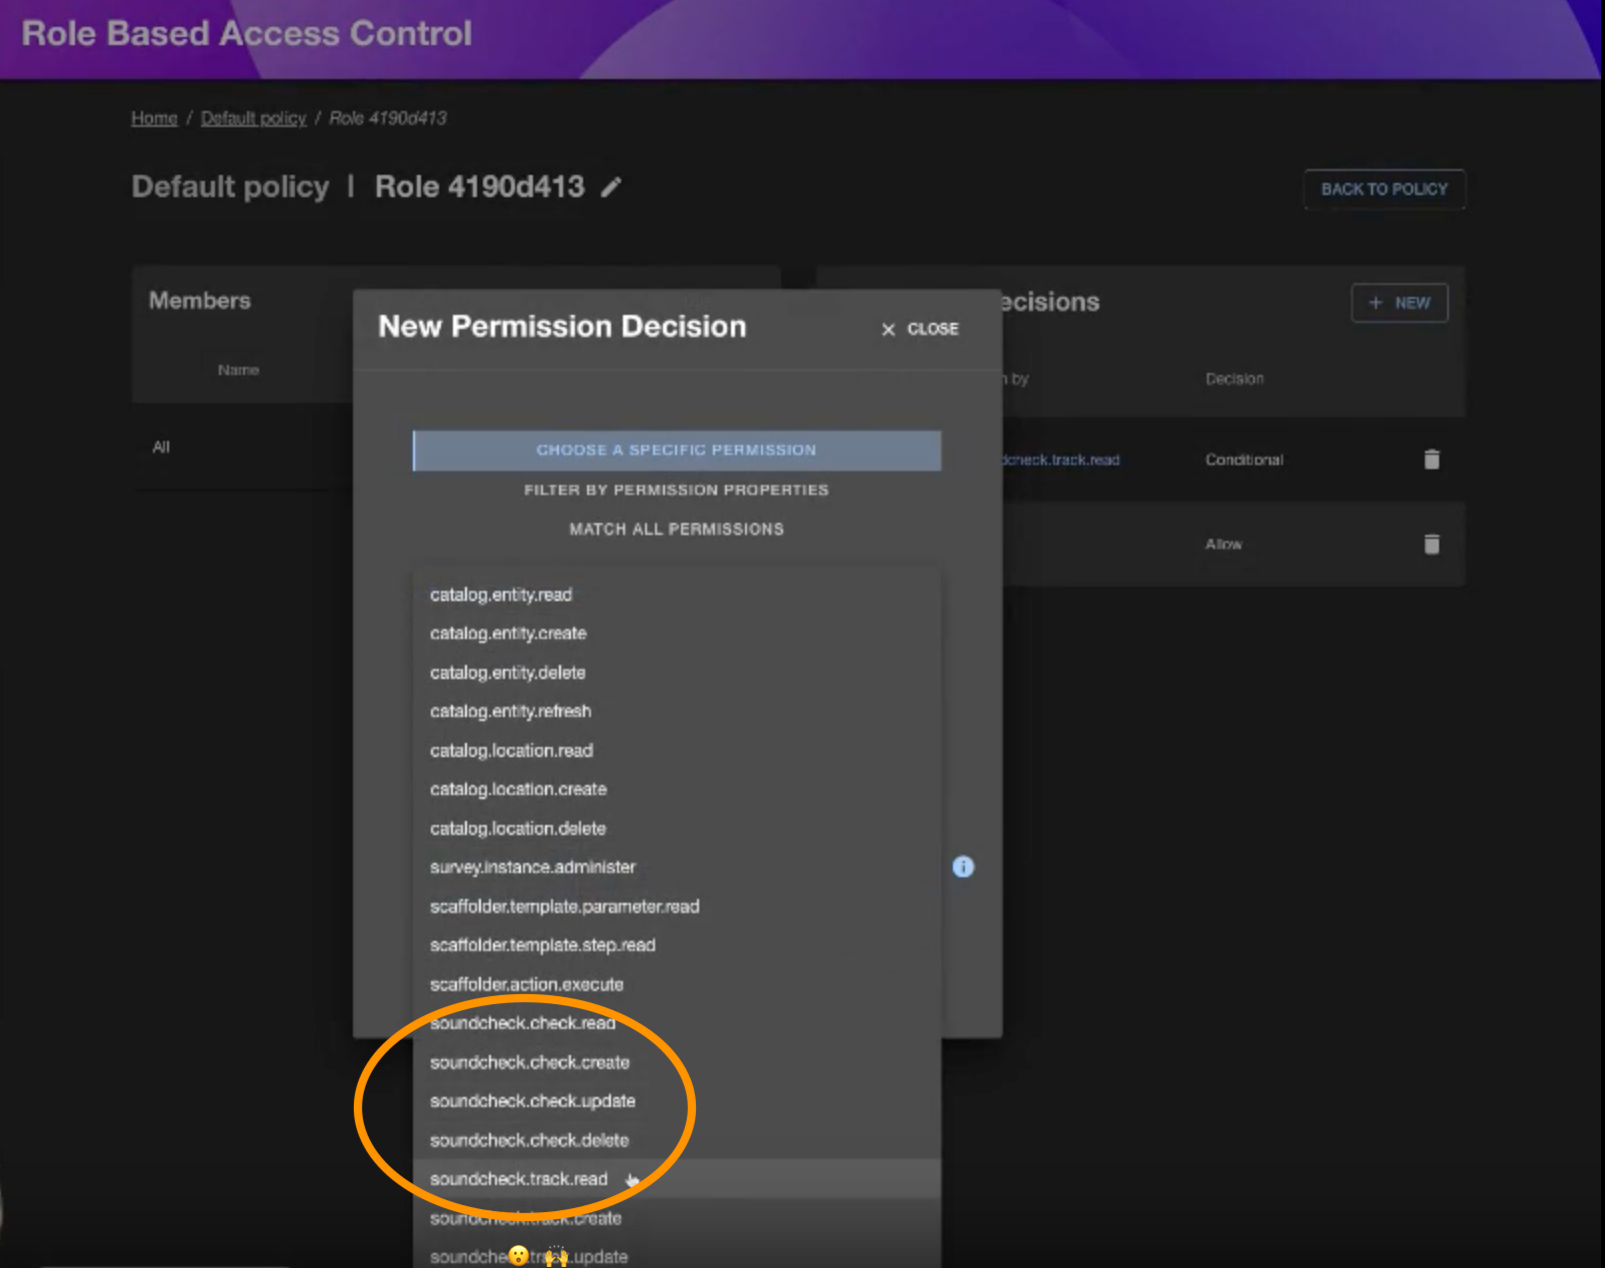
See the [Available Permissions](#available-permissions) section for details on what the permissions entail.
Here is a basic sample `any-allow` policy that allows the default user general access to the catalog but restrict access to create, edit, delete checks or tracks.
```yaml sample-policy.yaml theme={"theme":{"light":"github-light","dark":"dracula"}}
name: Sample Soundcheck Policy
description: null
options:
resolutionStrategy: any-allow
roles:
- name: Default user
members: '*'
permissions:
- match:
resourceType: catalog-entity
decision: allow
- match:
actions:
- read
resourceType: soundcheck-track
decision: allow
- match:
actions:
- read
resourceType: soundcheck-check
decision: allow
- name: Admin
members:
- group:default/backstage-admins
permissions:
- match: '*'
decision: allow
```
> To get started with this sample policy, save the content as a `yaml` file and follow the [RBAC import policy instructions](../rbac/setup-and-installation#import-and-export-a-policy).
### Option 2: Using custom policy handlers
It's also possible to define [custom handlers](https://backstage.io/docs/permissions/writing-a-policy) for policy queries made by Soundcheck.
```ts packages/backend/src/plugins/permissions.ts theme={"theme":{"light":"github-light","dark":"dracula"}}
class ExamplePolicy implements PermissionPolicy {
async handle(request: PolicyQuery): Promise {
if (request.permission.name === 'soundcheck.track.read') {
const isAllowed = await someEvaluationFunction();
if (isAllowed) {
return {
result: AuthorizeResult.ALLOW,
};
}
}
return { result: AuthorizeResult.DENY };
}
}
```
### Integrate the Plugin with Your Frontend App
Install the Soundcheck routes in your app within `packages/app/src/App.tsx` and configure the route location for the Search plugin. You can also add a sidebar item for easy access to Soundcheck if needed.
### Verify Functionality
After setting up access controls, users with the right permission should see a Soundcheck sidebar menu item. Ensure that the Backend plugin is correctly configured.
## Available Permissions
The Soundcheck plugin has the following permissions that can be used to control access to the plugin and its features:
| Permission | Description |
| ----------------------------- | -------------------------------------------------------------------------------------------------------------------------------------------------- |
| `soundcheck.check.create` | Allows a user to create or import checks via the Soundcheck No-Code UI |
| `soundcheck.check.read` | Allows a user to view the library of checks |
| `soundcheck.check.update` | Allows a user to edit a check that was created via the Soundcheck No-Code UI\* |
| `soundcheck.check.delete` | Allows a user to delete a existing check that was created via the Soundcheck No-Code UI\* |
| `soundcheck.track.create` | Allows a user to create or import tracks via the Soundcheck UI. Also allows a user to convert a campaign to a track via the campaign archive flow. |
| `soundcheck.track.read` | Allows a user to view the library of tracks |
| `soundcheck.track.update` | Allows a user to edit a track that was created via the Soundcheck No-Code UI\* |
| `soundcheck.track.delete` | Allows a user to delete a existing track that was created via the Soundcheck No-Code UI\* |
| `soundcheck.collector.read` | Allows a user to view the list of fact collectors currently configured |
| `soundcheck.collector.update` | Allows a user to configure the facts collected by the fact collector\*\* |
| `soundcheck.campaign.create` | Allows a user to create a campaign |
| `soundcheck.campaign.read` | Allows a user to view the library of campaigns |
| `soundcheck.campaign.update` | Allows a user to update a campaign |
| `soundcheck.campaign.delete` | Allows a user to archive AND delete a campaign |
| `soundcheck.fact.update` | Allows a user to submit a fact to the /facts endpoint. |
> \*Checks and tracks created via config are not editable within the Soundcheck UI.
> \*\*Only the Github fact collector is available for configuration using the No-Code UI. If you already have a fact collector config YAML file setup, you will be unable to use the No-Code UI to configure your collector.
## Optional Configurations
### Group Filter
Soundcheck allows users to filter by group/owner on several of its pages. By default, Soundcheck will show groups of every type.
For organizations with many groups, or several group types, it can be useful to configure Soundcheck with a group filter,
specifying which groups are relevant to Soundcheck. Additionally, these group filters also improve the performance of
the Soundcheck backend when filtering by owner.
To configure the group filter, add a `soundcheck.entityFilters.group` config block to your config file. The `soundcheck.entityFilters.group` config accepts a [catalog filter](https://backstage.io/docs/reference/catalog-client.entityfilterquery/).
```yaml app-config.yaml theme={"theme":{"light":"github-light","dark":"dracula"}}
soundcheck:
entityFilters:
group:
spec.type:
- company
- department
- team
```
The above configuration will tell Soundcheck to provide groups of type `company`, `department`, or `team` as options in its UI.
Any group not matching the configured filter will not be shown in the Soundcheck UI.
If filtering by group type (`spec.type`), the filter should include every type
of group that may own an entity ***and their ancestors***.
### Applicable Entities Refresh
This configuration option allows you to set the batchSize, frequency, initial delay, and timeout for
refreshing Soundcheck's cache of applicable entities for checks, tracks and campaigns. This caching makes the
check, track, campaign and tech insight pages load faster by pre-fetching entities relevant to the various
checks, tracks and campaigns in the system.
Defaults are shown below, and this section can be omitted if you do not want to change the defaults.
```yaml app-config.yaml theme={"theme":{"light":"github-light","dark":"dracula"}}
soundcheck:
applicableEntitiesRefresh:
# The number of entities to fetch from catalog at a time.
batchSize: 1000
# The remaining options are human durations and accept
# any combination of hours, minutes, and seconds.
# frequency config additionally supports cron expressions, e.g. cron: '0 0 * * *'.
frequency:
hours: 4
initialDelay:
minutes: 5
timeout:
hours: 2
```
If you are using in-memory caching with multiple Soundcheck instances/pods, be
aware that this job will run on every pod. This can lead to an increased load
on your database. We suggest using a persistent caching solution, such as
Redis, to mitigate this. More details are available
[here](https://backstage.io/docs/overview/architecture-overview/#use-redis-for-cache).
### Group Hierarchy Refresh
This configuration option allows you to set the batchSize, frequency, initial delay, and timeout for
refreshing Soundcheck's cache of group hierarchy. This caching makes the
tech insight page load faster by pre-fetching the hierarchy of groups and group types.
Defaults are shown below, and this section can be omitted if you do not want to change the defaults.
```yaml app-config.yaml theme={"theme":{"light":"github-light","dark":"dracula"}}
soundcheck:
groupHierarchyRefresh:
# The number of entities to fetch from catalog at a time.
batchSize: 1000
# The remaining options are human durations and accept
# any combination of hours, minutes, and seconds.
# frequency config additionally supports cron expressions, e.g. cron: '0 0 * * *'.
frequency:
cron: '0 0 * * *' # midnight UTC time
initialDelay:
seconds: 10
timeout:
hours: 2
```
If you are using in-memory caching with multiple Soundcheck instances/pods, be
aware that this job will run on every pod. This can lead to an increased load
on your database. We suggest using a persistent caching solution, such as
Redis, to mitigate this. More details are available
[here](https://backstage.io/docs/overview/architecture-overview/#use-redis-for-cache).
### Scaling and Rate Limiting
To optimize the scalability of Soundcheck, it is highly recommended to configure a Redis connection. This integration
enables Soundcheck to efficiently distribute tasks such as fact collection and check executions across multiple
instances of the `soundcheck-backend`.
To configure Soundcheck to use Redis add the following to your `app-config.yaml` file:
```yaml theme={"theme":{"light":"github-light","dark":"dracula"}}
soundcheck:
job:
queues:
type: redis
host:
port:
username:
password:
```
TLS for redis can be enabled by setting `tls: true`:
```yaml theme={"theme":{"light":"github-light","dark":"dracula"}}
soundcheck:
job:
queues:
type: redis
host:
port:
username:
password:
tls: true
```
You can also pass in custom tls certificate parameters like so:
```yaml theme={"theme":{"light":"github-light","dark":"dracula"}}
soundcheck:
job:
queues:
type: redis
host:
port:
username:
password:
tls:
cert: ${REDIS_TLS_CERT}
key: ${REDIS_TLS_KEY}
ca: ${REDIS_CA}
```
You can also use a redis secure connection:
```yaml theme={"theme":{"light":"github-light","dark":"dracula"}}
soundcheck:
job:
queues:
type: redis
connection: rediss://:@:
```
The configuration above enables Redis for tasks such as fact collection and check executions.
Additionally, the Soundcheck backend can utilize persistent cache stores such as Redis to enhance both performance and reliability.
More details are available [here](https://backstage.io/docs/overview/architecture-overview/#use-redis-for-cache).
```yaml theme={"theme":{"light":"github-light","dark":"dracula"}}
backend:
cache:
store: redis
connection: redis://:@:
```
#### Rate Limiting
Soundcheck offers configurable rate limiting to control the frequency of fact collections on a per-fact collector basis.
This feature is useful when a fact collector leverages a third-party API that imposes rate limits (e.g., GitHub API).
Configure rate limits for specific fact collectors by enhancing your app-config.yaml file with the following details:
```yaml theme={"theme":{"light":"github-light","dark":"dracula"}}
soundcheck:
job:
workers:
:
limiter:
max:
duration:
```
The `max` parameter establishes an upper threshold for the number of fact collection jobs Soundcheck will perform from
with the specified collector within the given duration. Should the job count exceed this limit, additional jobs are
queued.
The `duration` parameter determines the time window during which the specified maximum number of collection jobs (set by
`max`) is enforced. After this duration, the count resets, allowing Soundcheck to process a new set of collection jobs
up to the specified maximum.
For example we can limit Soundcheck to only requesting 5000 fact collections per hour from the `github` fact
using the following configuration:
```yaml theme={"theme":{"light":"github-light","dark":"dracula"}}
soundcheck:
job:
workers:
github:
limiter:
max: 5000
duration: 3600000
```
By default, each worker has a rate limit of `max: 100` and `duration: 1000`, aka 100 executions per second.
##### Automatic Rate Limiting
Many of Soundcheck's fact collectors will automatically handle rate limit errors that call third party APIs (provided the third party integration implements this feature) by pausing collection temporarily and retrying after some time. This pause time is determined by the third party integration, but has a default of 60 seconds.
### Slack Notifications
Direct Slack notifications are **deprecated** and will be removed in a future
release. Use the [Backstage Notifications
plugin](/plugins/soundcheck/core-concepts/notifications) instead. See the
[migration
guide](/plugins/soundcheck/core-concepts/notifications#migrating-from-legacy-soundcheck-notifications)
for details.
To enable Slack notifications, Slack needs to be integrated within Soundcheck.
> Note: This is an optional Soundcheck feature. If you choose not to enable this feature, you can skip the instructions below. To integrate Slack within Soundcheck for the first time, follow the steps below.
#### Manifest file
To create a custom Slack app, use the manifest file provided below. The provided file lists the scopes required for Soundcheck notifications.
Refer to Slack's [Create apps using manifests](https://api.slack.com/reference/manifests#creating_apps) documentation to learn more.
The first step in the Slack documentation linked above contains a [Click to create Slack app](https://api.slack.com/apps?new_app=1) button that will allow you to begin the Slack app creation process. Clicking on the button will open a **Create an app** prompt with two options: **from scratch** or
**from an app manifest**. Select **from an app manifest** in order to use the manifest provided below.
Step 1 of 3 in the Slack app creation process consists of picking a workspace to develop your Slack app in. Step 2 of 3 will prompt you to enter the app manifest. Click on the **YAML** tab and copy/paste the manifest below.
```yaml theme={"theme":{"light":"github-light","dark":"dracula"}}
# This file is an example Slack app manifest used for installing a custom app
# in your workspace to deliver Soundcheck notifications. For more information,
# see https://api.slack.com/reference/manifests
display_information:
name: Soundcheck for Backstage
description: Enables notifications from Soundcheck for Backstage in Slack.
background_color: '#9BF0E1'
features:
bot_user:
display_name: Soundcheck for Backstage
always_online: true
oauth_config:
scopes:
bot:
# scopes needed to read user information
- users:read
- users:read.email
# scopes needed to send messages
- chat:write
- chat:write.public
settings:
interactivity:
is_enabled: true
org_deploy_enabled: false
socket_mode_enabled: true
token_rotation_enabled: false
```
Step 3 of 3 displays an app creation review summary. Click on the **Create** button to complete the process.
#### Tokens
A custom Slack app, an app token, an oauth token, and a signing secret must be created to set up Slack integration.
* **app token:** The app token can be found, or generated, in the **App-Level Token** box. If you are generating an app token for the first time, be sure to give it the `connections:write` scope.
* **oauth token:** The oauth token can be found in the **Oauth & Permissions** section of the **Oauth tokens for Your Workspace** box. It should look something like `xoxb-...`.
* **signing secret:** Go to the **Basic Information** section of your Slack app. The signing secret can be found in the **App Credentials** box.
Next, the Slack app token, oauth token, and signing secret must be added to your `app-config.yaml` (or equivalent) file.
```yaml app-config.yaml theme={"theme":{"light":"github-light","dark":"dracula"}}
soundcheck:
# ...
slack:
token: xoxb-*************-*************-************************ #aka "oauth token", or "bot token"
appToken: xapp-*-***********-*************-****************************************************************
signingSecret: ********************************
# ...
```
#### Socket Mode
Socket mode must be enabled for your Slack app. Under **Settings**, click on **Socket Mode**. Then, click on the **Enable Socket Mode** switch to toggle it on. Finally, make sure that the **Interactivity & Shortcuts** feature is enabled.
#### Adding the Slack app to a Slack channel
In order to get Slack notifications from your Slack app, it must be added to a Slack channel. The Slack channel can be either a public or a private channel that lives in the same workspace that you selected when creating the Slack app.
Right-click on the desired channel in Slack, select **View Channel Details**, click on the **Integrations** tab, and then click on **Add Apps**. Search for your Slack app by name, find it in the search results, and then click on the **Add** button.
### Email Notifications
Direct email (SMTP) notifications are **deprecated** and will be removed in a
future release. Use the [Backstage Notifications
plugin](/plugins/soundcheck/core-concepts/notifications) instead. See the
[migration
guide](/plugins/soundcheck/core-concepts/notifications#migrating-from-legacy-soundcheck-notifications)
for details.
To enable email notifications, SMTP server details must be configured within Soundcheck.
> Note: This is an optional Soundcheck feature. If you choose not to enable this feature, you can skip the instructions below.
To integrate email notifications within Soundcheck for the first time, an email configuration must be added to your app-config.yaml (or equivalent) file. Examples are provided below.
#### SMTP Connection Authentication
Here's an example of the `email` configuration for username and password authentication.
```yaml app-config.yaml theme={"theme":{"light":"github-light","dark":"dracula"}}
soundcheck:
# ...
email:
# hostname or IP address of the SMTP server
host: sandbox.smtp.mailtrap.io
# port to connect to
port: 2525
# sender email address
from: info@soundcheck.com
# authentication details
auth:
# username
user: d92xxxxxxxxxxx
# password
pass: 3f4xxxxxxxxxxx
# ...
```
Here's an example of the `email` configuration for `OAuth2` authentication.
```yaml app-config.yaml theme={"theme":{"light":"github-light","dark":"dracula"}}
soundcheck:
# ...
email:
# hostname or IP address of the SMTP server
host: smtp.gmail.com
# port to connect to
port: 465
# sender email address
from: info@soundcheck.com
# authentication details
auth:
# username
user: user@example.com
# client id of the application
clientId: 000000000000-xxx0.apps.googleusercontent.com
# client secret of the application
clientSecret: XxxxxXXxX0xxxxxxxx0XXxX0
# optional refresh token (used to generate a new access token if the existing one expires/fails)
refreshToken: 1/XXxXxsss-xxxXXXXXxXxx0XXXxxXXx0x00xxx
# optional access token
accessToken: ya29.Xx_XX0xxxxx-xX0X0XxXXxXxXXXxX0x
# ...
```
#### Node Options
If you're running Backstage with Node 20 or later, you'll need to pass the flag `--no-node-snapshot` to Node in order to use the email notifications feature. One way to do this is to specify the `NODE_OPTIONS` environment variable before starting Backstage.
```sh theme={"theme":{"light":"github-light","dark":"dracula"}}
export NODE_OPTIONS=--no-node-snapshot
```
### Open Telemetry and Instrumentation
Soundcheck provides a limited set of open telemetry metrics. To enable telemetry, please refer to the [backstage open telemetry setup](https://backstage.io/docs/tutorials/setup-opentelemetry/).
#### Metrics Reference
* `soundcheck.fact.collection.count`: count of collections made by `status`, `collectorId`, and `factName`.
* `soundcheck.track.certification.count`: count of certifications by `trackId`, `level`, and `state`.
* `soundcheck.check.result.count`: count of check results (including from the API) received by Soundcheck by `checkId` and `state`.
* `soundcheck.fact.collection.time`: histogram for fact collection time in ms by `collectorId` and `factName`. The collection time is per batch.
* `soundcheck.check.execution.time`: histogram for check execution time in ms by `checkId`.
* `soundcheck.queue.jobs_queued.gauge`: gauge for the total size of all jobs queued. Jobs are fact-collection tasks on a per entity-fact pair basis. This metric is for local job queues only, not BullMQ/Redis queues. See [BullMq Instrumentation](https://github.com/appsignal/opentelemetry-instrumentation-bullmq) for those instead.
More Backstage metrics can be found [here](https://backstage.io/docs/tutorials/setup-opentelemetry/#available-metrics).
### System Requirements
Soundcheck runs cache warming jobs that can be memory-intensive:
* [refresh-applicable-entities](#applicable-entities-refresh)
* [soundcheck-group-hierarchy-refresh](#group-hierarchy-refresh)
These jobs may temporarily increase both memory and CPU usage, especially during initialization or
when preloading large caches. To ensure stable operation, users should monitor CPU and memory utilization
and adjust the [Node.js memory limit](https://nodejs.org/api/cli.html#--max-old-space-sizesize-in-megabytes) as needed.
For example:
```sh theme={"theme":{"light":"github-light","dark":"dracula"}}
export NODE_OPTIONS="--max-old-space-size=4096"
```
This allocates up to 4 GB of memory for the old space. Adjust the value based on available system
resources and observed workload behavior. Regular monitoring and gradual tuning of this setting can
help maintain optimal performance and prevent crashes caused by insufficient heap memory.